
Tick Data Suite 2 Program - How to Configure It Correctly

The Tick Data Suite program has long been known among professional algo traders. It has quite a lot of settings and options that are not always clear to the user. This guide is intended to help with configuring and using the program.
As is known, for effective and profitable trading of forex advisors on real accounts, it is impossible to do without quality testing. Testing allows you to identify the strengths and weaknesses of the expert, choose the optimal settings, and make sure that the selected tactics and working strategy are correct.
For this we need special software.
In today's material, our well-known forum member prepared interesting material on installing and configuring the Tick Data Suite (TDS-2) program, and also kindly shared his personal experience of working with it.

Tick Data Suite (hereinafter abbreviated as TDS-2) after installation on a PC consists of two parts: the program for downloading quotes Tick Data Manager and a separate module that is integrated into all terminals.
At the time of writing this guide, the latest version of the program is v.2.2.35.0 with support for terminal build 1260.
Most of the tips and recommendations are taken from the program support site https://eareview.freshdesk.com/support/home, as well as from personal work experience.
Questions of installation, licensing and maintenance of the program, descriptions of various problems and errors can be read at the link above. Below there will only be descriptions of the TDS-2 settings themselves without considering the operating principles of the terminal strategy tester, whose algorithm remains standard.
Tick Data Manager

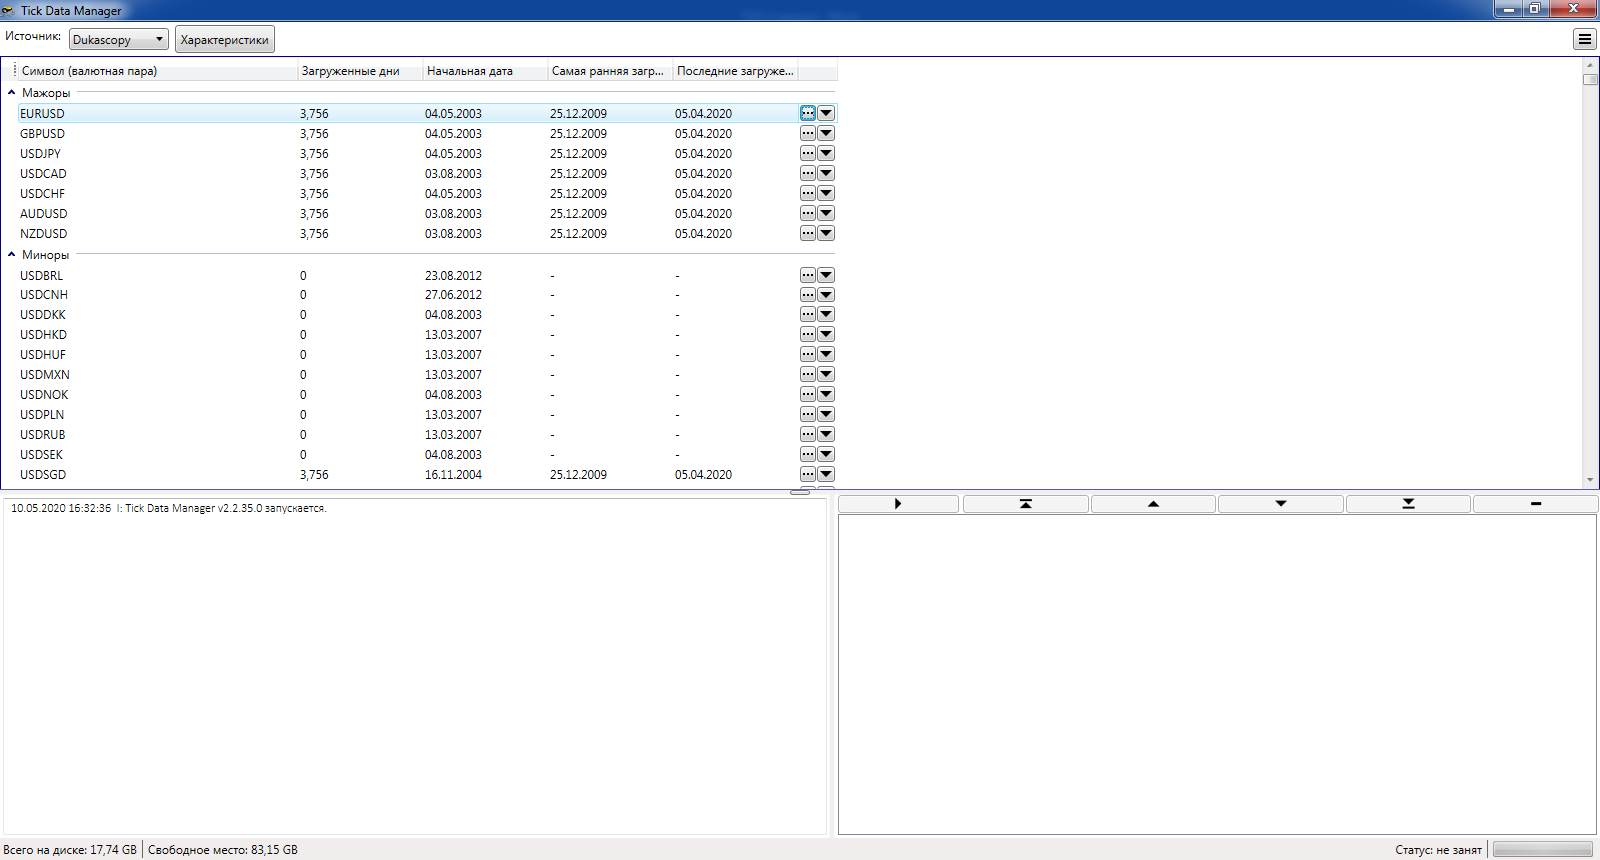
The Source parameter and the Properties window. Here the quotes of the required broker, the GMT, DST parameters, and the download path are selected. We leave everything at default for each source. The GMT and DST parameters will be adjusted in the terminal's Tick Data Settings, and the path for downloading all quotes is set in the Settings window.
The Actions and Queue for download parameters. They are active opposite each currency pair or instrument. If the download is happening for the first time, then it is better to do it through the Actions parameter by setting the required period. The next download of quotes through the Queue for download parameter will add the missing days from the end of the period of the previous download. On the tabs of the Actions parameter there is an opportunity to export quotes with fairly fine settings.
The Settings window. We select the desired language, which will be the same both for Tick Data Manager and for the settings module in the terminals. We also specify the path to the quotes repository. The quotes developers recommend downloading them to an SSD drive. Everything else is left at default.
Tick Data Settings Window in the Terminal Strategy Tester

TDS-2 is enabled by activating the Use tick data checkbox in the terminal strategy tester window. In this same Strategy Tester window, the Spread parameter will change from the current one to variable if you activate the Use variable spread parameter on the Main tab of the Tick Data Settings window.
In the Tick Data Settings window:
Main Tab
Default tab settings:
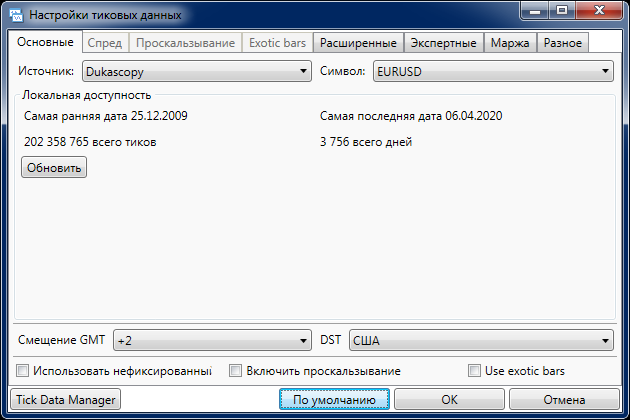
The highlight of TDS-2 is the ability to test advisors on quotes with a floating spread (the real difference between bid and ask prices). Therefore, we must activate the Use variable spread parameter.
You should check that the Source (tick data) and Symbol parameters are correct and are not empty. A frequent cause of a failed testing start is an empty Symbol field, which sometimes gets reset after manipulations with opening/closing the terminal, adding/removing symbols, etc. Then in the log we can see the following entry:
Also on this tab you can see the history of downloaded quotes for the selected source.
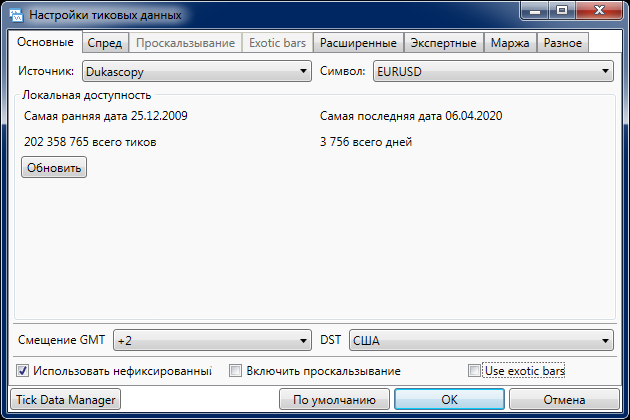
Important parameters of the tab are the GMT Offset and DST. Advice and recommendations from the developers:
Exception to the rule: If the advisor code already contains a GMT time shift, for example, time +2 in the settings equals 0, then this nuance should be taken into account, and during testing the advisor's GMT settings should be left as its author specified them.
Most major brokers use GMT +2 and US DST. For testing advisors with such brokers on Dukascopy quotes, it is advisable to configure the Main tab as follows:
If you need to make a test with slippage, activate the corresponding tab with the Enable slippage parameter.
Spread Tab
Tab settings by default:
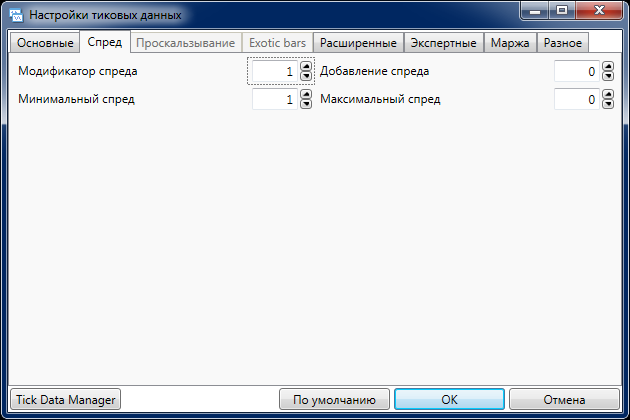
It is activated by enabling the Use variable spread parameter on the Main tab.
Several spread-related parameters are configured here at once.
Spread (mult) modifier is a number that will be used as a multiplier for the spread of the selected quote source.
For example, if a particular tick had a spread of 20 points, then with a spread modifier of 1,5 it will be adjusted to 30 points, and with a spread modifier of 0,5 to 10 points.
Spread addition allows you to set the number of points added to the spread. The value can also be negative.
For example, if a particular tick had a spread of 20 points, then with a spread addition of 5 points it will be adjusted to 25 points, and with a spread addition of -5 to 15 points.
The Minimum spread parameter allows you to set the minimum spread threshold. Any spread that is below this threshold will be set to the configured value.
For example, if the Minimum spread is 5 points, then a tick with a spread of 3 points will be adjusted to 5 points.
The Maximum spread parameter allows you to limit the spread. Any spread that exceeds the set value will be set to that value.
For example, if the Maximum spread is 50 points, then a tick with a spread of 60 points will be adjusted to 50 points. This parameter is disabled with the value 0.
It is important to note that the Minimum spread and Maximum spread parameters do not prohibit opening orders during testing, unlike the Maxspread parameter of many expert advisors.
Spread settings are applied in the following order: 1) Spread modifier, 2) Spread addition, 3) Minimum and Maximum spread. For example, a particular tick has a spread of 20 points, the spread modifier is 1,5, the spread addition is 5 points, and the maximum spread is set to 32 points. We get: 20*1,5+5=35 points, which are turned into 32 points by the last parameter in the sequence.
Tips and recommendations from personal experience

Slippage Tab
Tab settings by default:
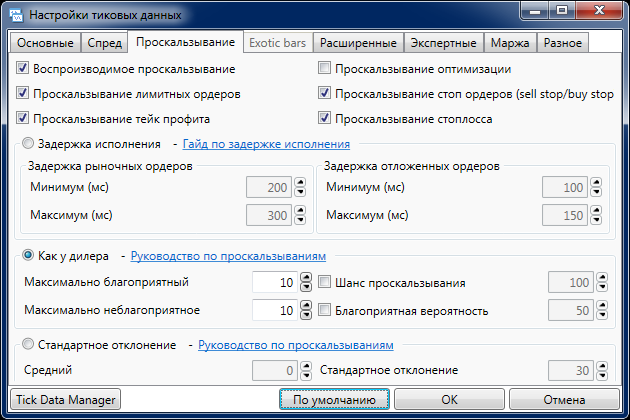
It is activated by enabling the Enable slippage parameter on the Main tab.
TDS-2 allows you to simulate slippage in historical tests, similar to how slippage often occurs on real accounts. In earlier versions of the program there was a conflict between slippage settings and the slippage parameter that was displayed separately in the expert advisor settings. This often led to a large number of errors OrderSend 138 (requotes) in the testing log and to incorrect testing results. The developers removed this issue, but added a separate Confirm OrderSend() slippage parameter setting on the Misc tab. The developers recommend enabling the above parameter only if you know the code of the expert advisor or understand that the slippage settings in TDS-2 will not conflict with the algorithm or settings of the expert advisor. Ideally, the slippage in points set in any of the parameters on the corresponding TDS-2 settings tab should not exceed the slippage in points in the settings or external parameter of the expert advisor, if any.
The tab has six parameters and three types of slippage. The latter cannot be used together.
Reproducible slippage controls the randomness of slippage. If the option is enabled (by default), the tester will remember the results, and repeated testing will lead to identical slippage for each trade. For cleaner experiments, it is better to disable this parameter - the more runs with different types and cases of slippage a set can withstand, the better it is.
Optimization slippage controls whether it will occur during optimization. The developers strongly recommend not enabling this function because of the uneven distribution of slippage chances for each individual variant during optimization. They also point out that if slippage in any form is active, while the Optimization slippage parameter is disabled, then after optimization is completed, when selecting any variant in the optimization window (by double-clicking), the optimization results and the backtest results (a separate run) will not match.
The four slippage parameters for limit orders, stop orders, take profits, and stop losses should preferably be left enabled - the whole point of using this function is their intentionally incorrect execution due to slippage.
The first type of slippage, Execution delay, simulates delays that occur on real accounts. It is measured in milliseconds and has separate maximum and minimum values for market and pending orders. The developers recommend not guessing the values, but using either the default ones (the average value for ECN brokers) or values calculated from real trading logs. Next to the toggle for activating this type of slippage there is a link to a full guide on how to use it. There are quite a lot of nuances and possible conflicts with expert advisor code. It is worth noting that the last parameters on the Misc tab, which the developers recommend not enabling, are also related to slippage settings.
The second type of slippage, Like a dealer, was created to simulate the Virtual Dealer plugin used by brokers. The Most favorable and Most unfavorable parameters control the maximum values in points that can be in either direction from the base price. Slippage chance in percent means that if it is disabled (by default), every order will slip. Favorable probability is the percentage of slippages that are positive for the trader.
The slippage of each order is random, but it does not go beyond the set values.
The third type of slippage, Standard Deviation, is based on the theory of normal distribution with the specified mean and standard deviation. These parameters can be obtained by recording a series of real slippages from the live trading log into Excel and using the Average() and StDev() functions.
Tips and Recommendations from Personal Experience

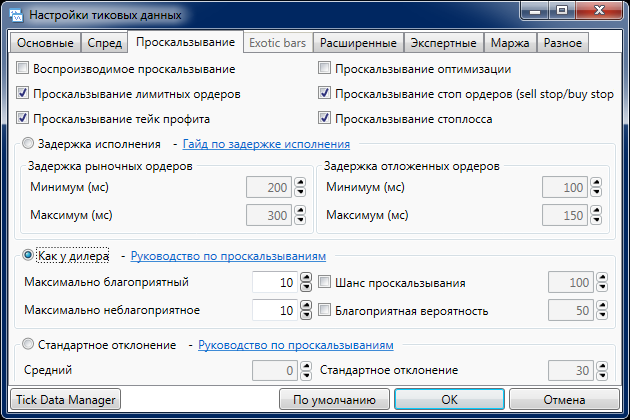
As a result, if there is a need to use the Slippage tab, the best settings will be the following ones (with different variations of the As by Dealer parameters):
Exotic Bars Tab
The default tab settings:
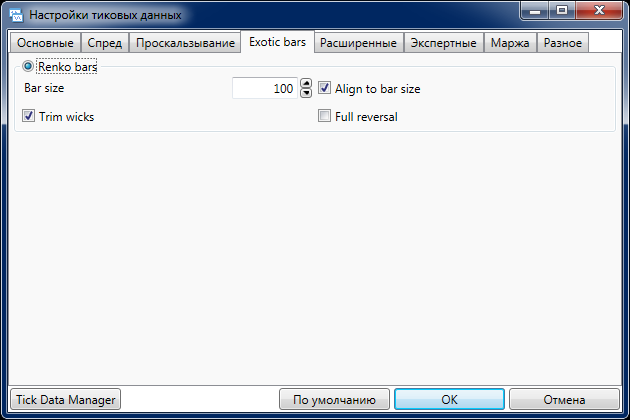
The new TDS-2 function is enabled on the first Main tab. It is used for tests on Renko bars.
Advanced Tab
The default tab settings:
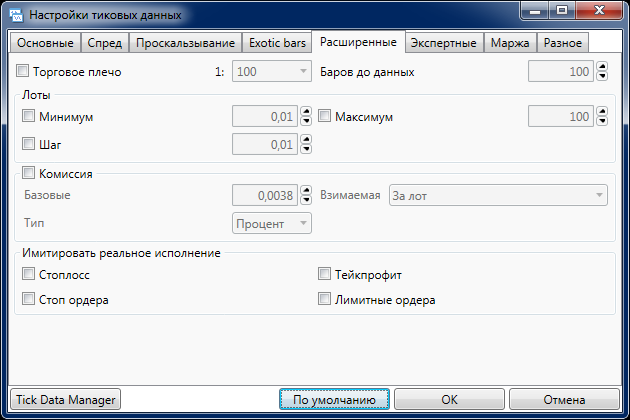
The lot and commission settings are taken from the MT4 account on whose terminal the tests are run. This also applies to the Leverage parameter, but it must be checked, as TDS-2 sometimes picks up its value incorrectly.
The Bars Before Data parameter is important if the expert advisor uses indicators with large period values. In some cases, the test may start with a delay equal to the difference in the missing candles; in some cases, it may not start at all. For indicator-based expert advisors, it is better to increase this value.
The Emulate Real Execution parameter block includes real processing of price gaps.
Tips and Recommendations from Personal Experience

It is better to set the window settings like this (we do not pay attention to the lot and commission parameters, they come from the broker): leverage as on the future live account, bars before data 1000, the four Emulate Real Execution parameters set to ON or OFF depending on the type of expert advisor and based on the advice above.
Expert and Margin Tabs
The default tab settings:
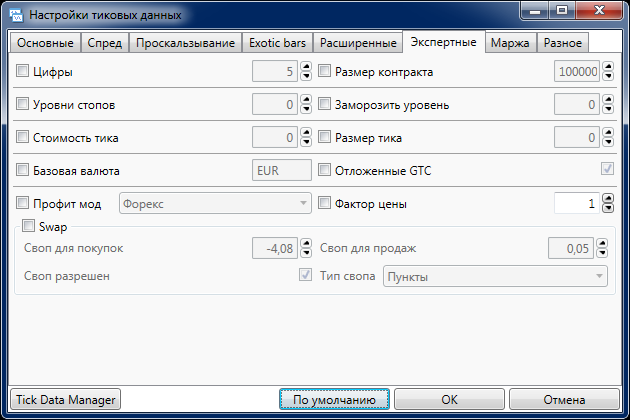
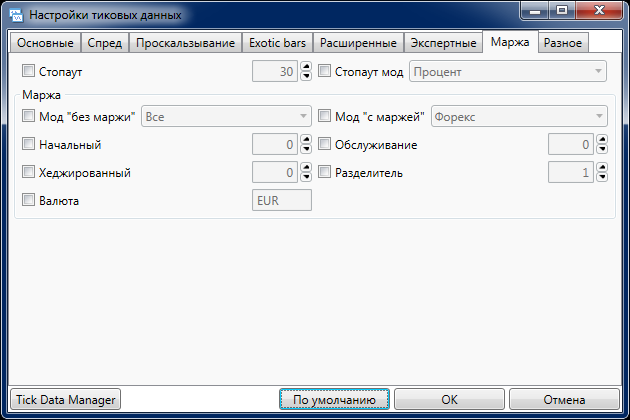
It is important to know that, similarly to the Advanced tab, all parameters of these tabs are taken from the MT4 account on whose terminal the tests are run. The developers recommend using a live account terminal with a trading or investor password. Almost all parameters are active even if they are unchecked. To change a parameter, you need to mark it and change the value to the required one. The best solution will be to test the expert advisor on the terminal of the broker and the account type on which trading will be conducted in the future.
Miscellaneous Tab
The default tab settings:
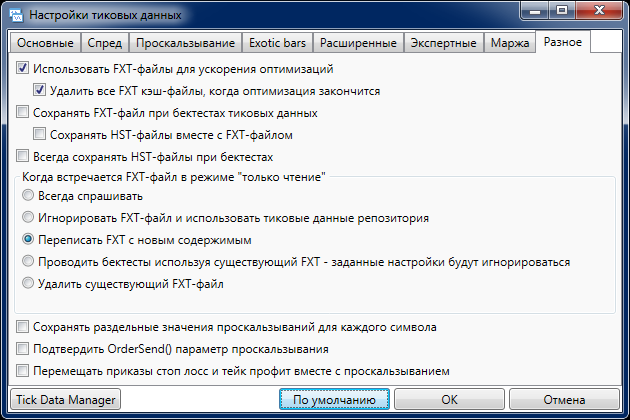
FXT files are useful for speeding up optimizations. For backtests, that is, individual runs, their help is not so significant. And if the same set file will be run several times in a row with different settings, then incorrectly configured parameters of this tab may even get in the way. It is better to leave everything on this tab at default.
An exception is the case when the tester really needs to run the expert advisor many times in a row on the same symbol and period of time. And if backtest speed matters to them, then it is worth activating the Save FXT File During Tick Data Backtests parameter and selecting the required value in When a FXT File in "Read-Only" Mode Is Encountered.
Some Features of Working with TDS-2

Sometimes the strategy tester refuses to start a backtest with TDS-2. The reasons for this are quite banal, but they can go unnoticed, especially if the trader has several terminals open, different currency pairs, expert advisors, and active switching between them. The reasons are:
Differences Between Optimization Results and Backtests of Individually Selected Variants

After the optimization is finished, the trader selects a variant they like in the optimization results window, double-clicks it with the left mouse button, launches it in a separate backtest, and gets a result that differs from the one obtained during optimization. A similar situation with differing results can happen even without optimization after several consecutive backtests of the same expert advisor with the same settings, currency pair, and backtest period on the same terminal. The differences can be caused by:
Conclusion

Differences between backtest results that were made on different terminals and on different computers will almost always exist. For everything to match, the terminals must have absolutely identical settings, and it does not matter whether these terminals are from different brokers or from the same one. It is worth remembering one point. If an expert advisor (especially a grid one) does not have active parameters that calculate profit/loss in money (rather than in points), exit trades depending on money or a percentage of the deposit, take commission and swaps into account when moving take-profits and stop-losses, then it is not particularly important on which terminal, of which broker, and with what commission, swap, margin, and so on settings to perform intermediate optimizations or backtests. Under the conditions stated above, the best sets will always be the best among comparable ones. But the final optimization or backtest should preferably already be done on the terminal of the broker and with the settings that will be used in trading.
Respectfully, Anatoliy aka tolyayugan
Tlap.io
