
Force Trader - a long-term robot based on Alexander Elder's system
 We have all heard more than once about the importance of diversification, but for the Forex market, where most currency pairs are tied to the U.S. dollar, solving the diversification problem is not so simple. Since diversifying by currency pairs is not really possible, one has to resort to some tricks. For example, use several different strategies at once, differing by type and operating period. Often traders try to combine both scalpers and strategy portfolios, as well as trend strategies and reversal ones, while operating on different periods, from M5 to D1.
At the same time, in addition to manual strategies, expert advisors are quite often used as well. There are not that many profitable advisors, in turn, and their authors most often strive to create a universal scalper that would be a one-man army. This approach has a number of advantages: the lower the timeframe, the more trades there are in the same unit of time. The more trades there are, the higher the profit and the smoother and more stable the equity curve looks. And today we will talk precisely about such an advisor, Force Trader, which can fit quite well into almost any strategy portfolio.

But there are, of course, drawbacks as well. Creating an advisor that would work well and stably in any market conditions for a sufficiently long time is quite difficult. Besides, the lower the timeframe, the greater the influence of various market factors such as the spread, swaps, and slippage on the final result. As the timeframe decreases, the requirements for testing quality and historical data grow exponentially.
And nevertheless, there is increased interest in such advisors, because the potential positive aspects outweigh the negative ones. Hence the serious drawback of long-term trading strategies, which are, in essence, the direct opposite of short-term strategies. Their main disadvantage is slow trading with low profitability, long drawdowns, and a small number of trades. On the other hand, this class of trading systems is easier to create and the requirements for testing there are the softest.
Such strategies can be launched with any broker, under any trading conditions, and the differences in trading results will be small. The only thing to remember is that the different shape of daily candles due to differences in server GMT, and occasionally a different number of trading days in the week, can still slightly affect the trading results.
Expert Advisor Characteristics
Platform: Metatrader 4
Expert advisor version: 1.0
Currency pairs: AUDCAD, AUDNZD, AUDUSD, EURUSD, NZDCAD, NZDUSD, CADCHF, USDCAD, USDJPY, USDCHF
Timeframe: D1
Operating time: around the clock
Recommended brokers: Roboforex, Alpari, Exness
Installing the Expert Advisor

We install the expert advisor as usual. Detailed installation instructions are described in the article on the website. If you have encountered Forex robots for the first time and have a lot of questions, download and watch the free course Forex on Autopilot.
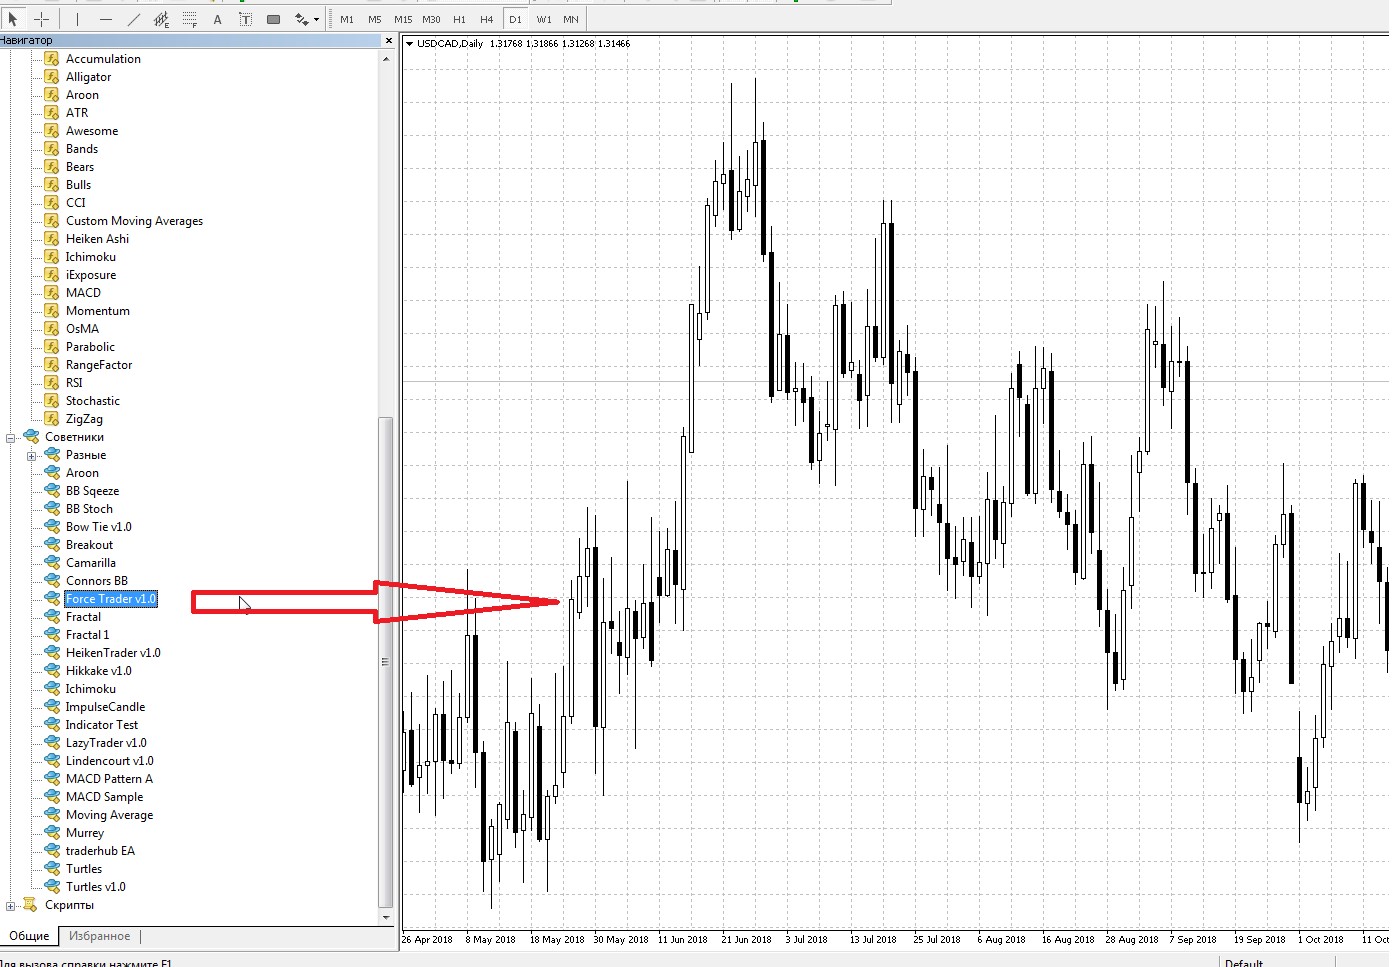
After restarting Metatrader, Force Trader v1.0 will appear on the Navigator panel, then we drag it into the selected currency pair window on the D1 timeframe.
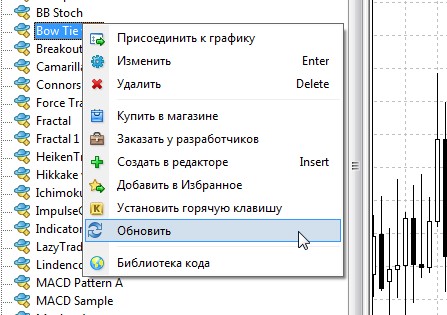
 Instead of restarting the terminal, you can also click the "refresh" button and the advisor will appear in the list:
Attention!
Do not forget to load the settings preset corresponding to the traded pair. To load a preset, when installing the advisor on the chart, in the settings window you need to click the Load button and select the required set:
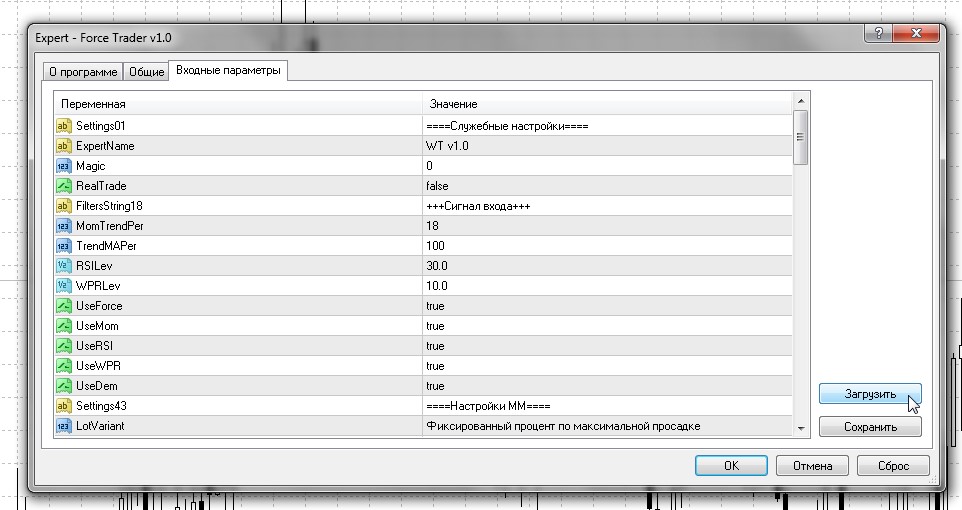 In this expert advisor, the settings significantly affect the trading results, use the recommended set files (see the archive at the end of this article).
The Expert Advisor's Operating Strategy

This is a long-term expert advisor that represents an adaptation of Alexander Elder's classic system for the Forex market. This is not the original system, but its loose adaptation. In addition to the Force Index, used in the original system for entry, the indicators Momentum, RSI, WPR, and DeMarker are also used according to the original principle, the crossing of the midline by the indicator.
The entry signal is formed in a comprehensive way, and if at least one of the conditions does not match, the entry will not be executed.
Let us break down the entry rules point by point.
- First, to determine the current trend, the Momentum indicator with the MomTrendPer period is used. If the current readings are above 100, only buys are possible. If the indicator readings are below 100, only sells are considered.
- If the correlated entry filter (BalancePairFilter) is enabled, then before opening a position the expert advisor will analyze already open trades. For example, if a buy trade is already open on EURUSD, then on GBPUSD only a sell can be opened. If a buy trade is open on GBPUSD, then sells on USDCHF are prohibited. A less strict filter can be obtained by enabling the OnlyCurrPair parameter. It allows tracking trades only for the currency in which a new trade is planned to be opened. That is, an open sell on USDJPY will not allow opening another sell on this pair.
- The next filter is UseMaxRiskFilter. It tracks the maximum risk on the account. Everything is simple here: if the potential loss of already open positions and the new position exceeds the MaxRisk value as a percentage of the deposit, the trade will not be opened. At the same time, trades whose stop has already been moved to the breakeven level are taken into account, but there is no longer any risk to the deposit there, and such trades do not participate in the calculation. If you set MaxRisk = 10%, while the current risk is 9%, and the risk per trade is 1.5%, then 9+1.5 = 10.5, which is greater than MaxRisk, and the trade will not be opened. Speaking of the current risk, it is calculated based on the current lot size and the stop levels of all trades on the account. That is, it is the loss that would result if at this moment all trades were closed by stop.
- Then the expert advisor looks at the position of the last closing price relative to the exponential moving average with the TrendMAPer period. If the last closing price is above the moving average, only buys are possible, otherwise only sells.
- Next, one of five oscillator options may be used: Momentum, Force, RSI, WPR or Dem. If several oscillators are used, a signal from just one of them is enough. The following settings are responsible for enabling one oscillator or another: UseForce, UseMom, UseRSI, UseWPR, UseDem. For a buy entry to occur, it is enough that Force on the previous candle crossed the zero level from top to bottom, or Momentum crossed the 100 level from top to bottom, or RSI was below the RSILev level, or WPR was below the WPRLev-100 level, or DeMarker was equal to zero. All this is flexibly configured in the corresponding settings block. For sells, the signal is formed similarly.
Here is a typical sell signal:
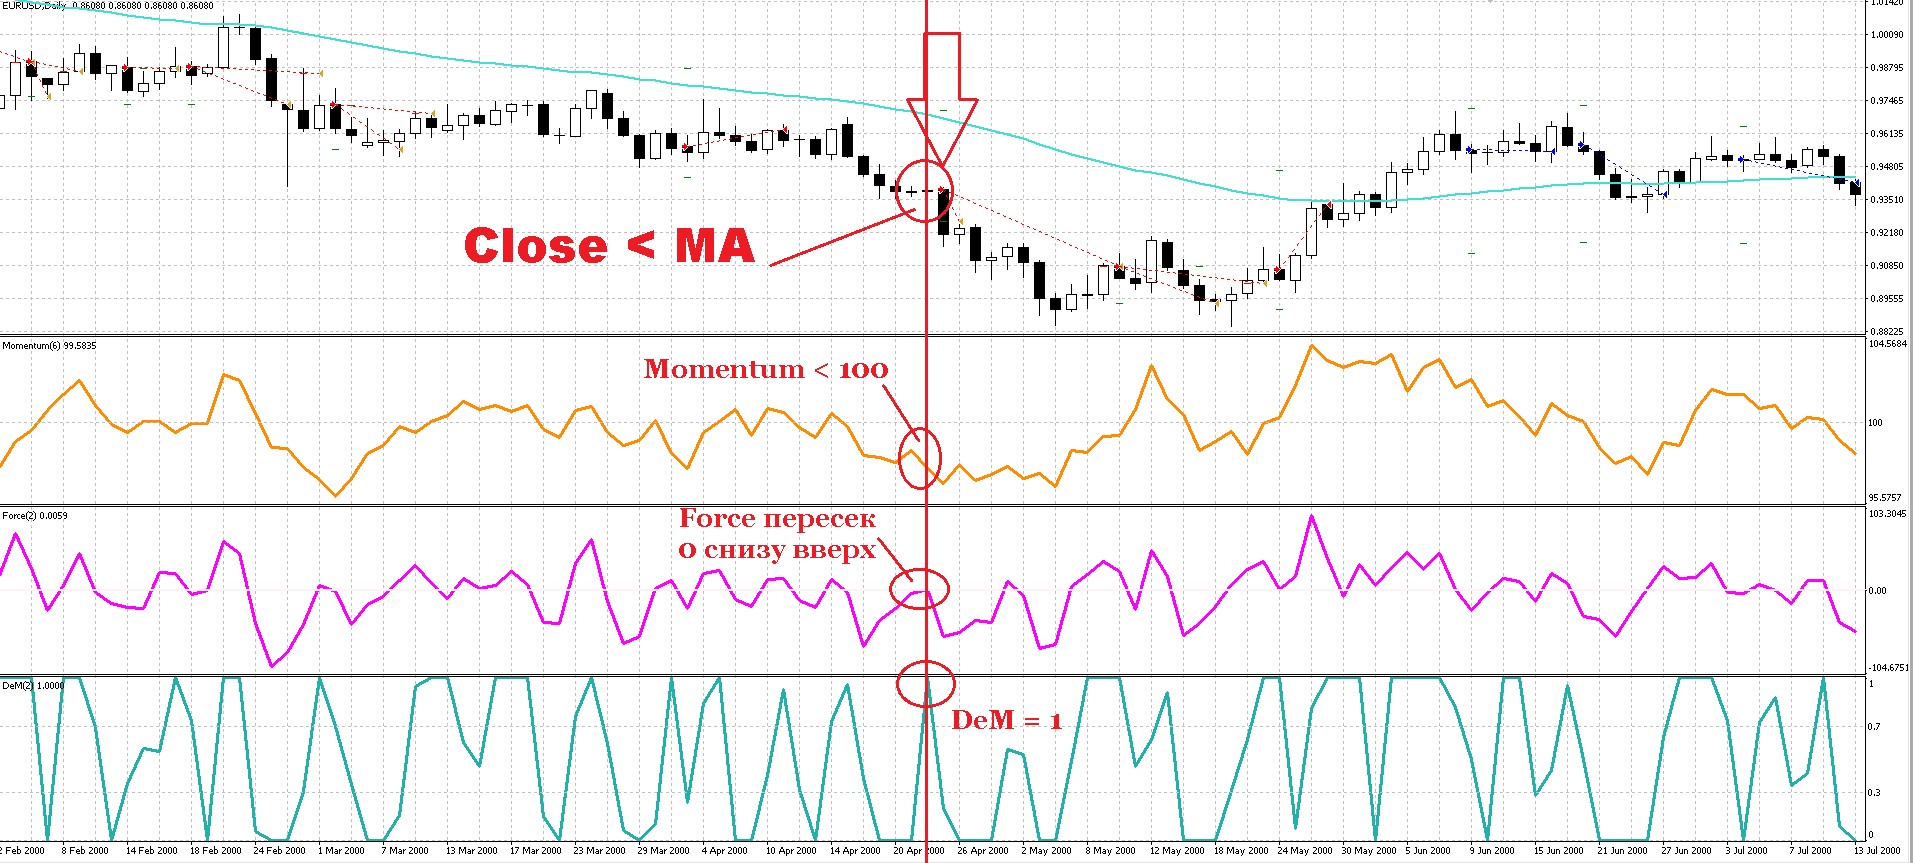 Example of a buy signal:
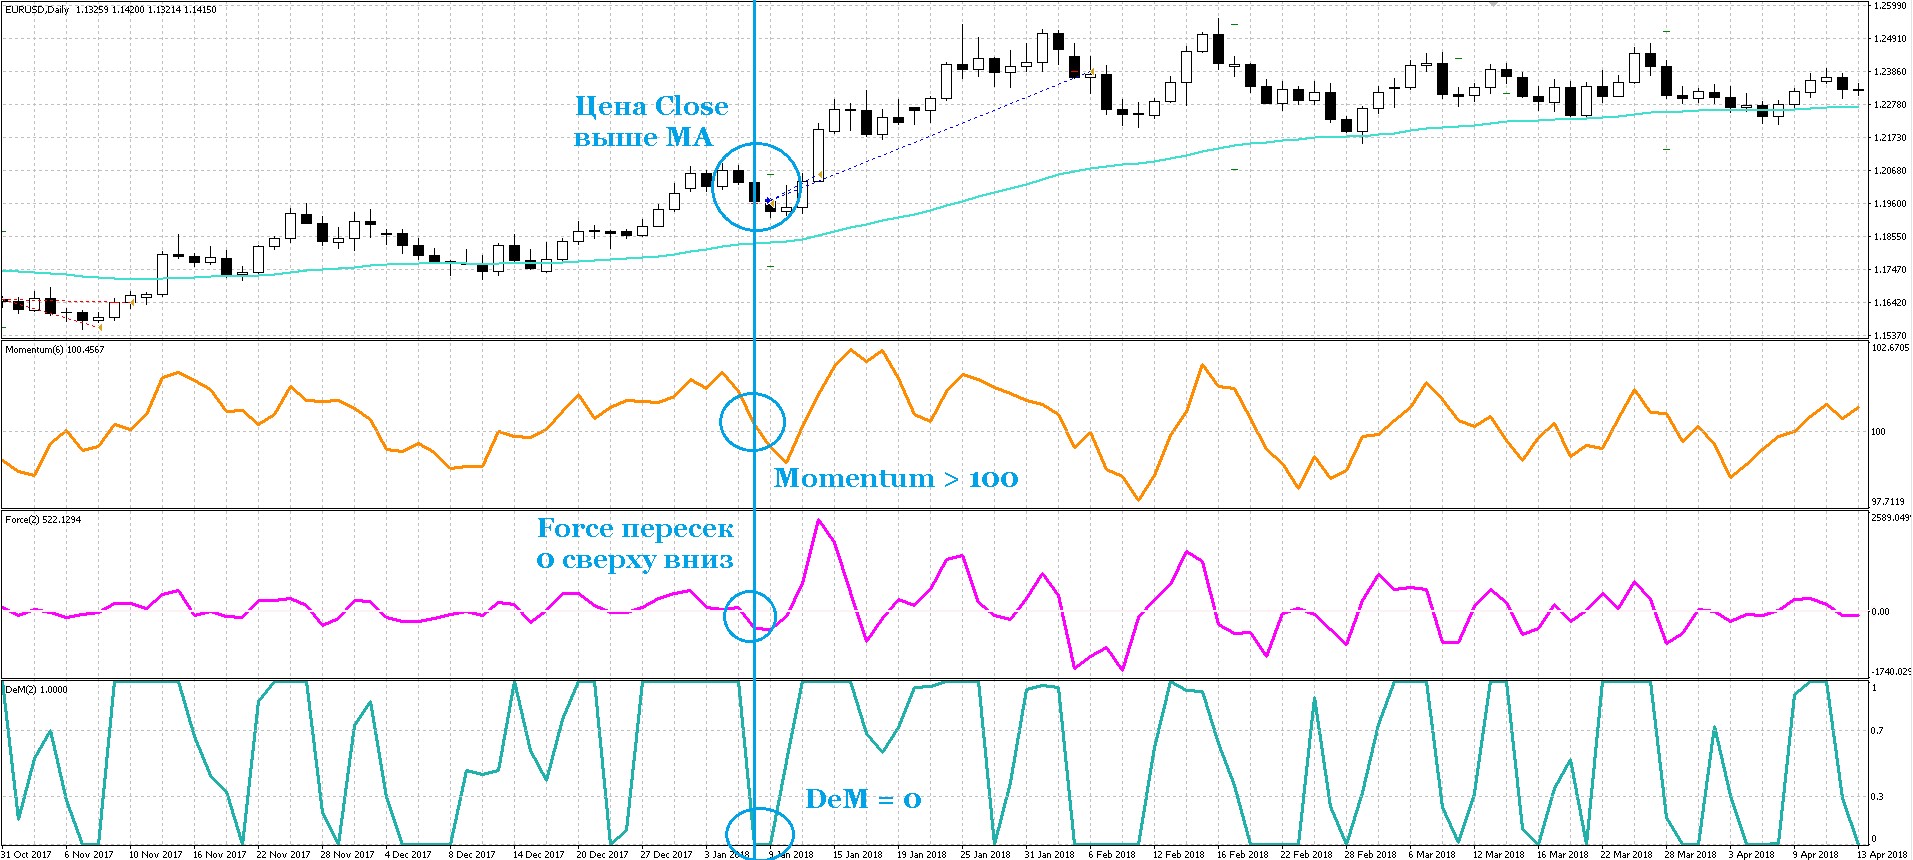 As you noticed, the expert advisor opens two orders at once. The first order may be handled according to the rules of the system, and each rule can be disabled in the settings and they work independently of each other. Let us break down the exit rules:
- The rule for updating lows or highs is enabled by the UseClassExit setting. After ExitProfitMinutesClass after opening a position, the expert advisor begins to monitor the possibility of exiting by this rule. It calculates the maximum for sells and the minimum for buys over the last ExitHist days, and if the closing price of the last day turns out to be below this minimum, the buy will be closed. In turn, if the closing price of the last day turns out to be above the maximum, the sell will be closed.
- The next rule, exit by ADX with the EADXPer period, is enabled by the UseADXExit setting. You can set three different variants of its action using the EADXVariant setting. The first variant is if the current ADX reading exceeds EADXLevel, an exit occurs. The second variant is a crossing of this level from top to bottom. And the third variant is when ADX rose for some time and then fell below the EADXLevel level. This rule becomes relevant only after ExitProfitMinutesADX days after entering the position.
- Exit by DEM with the EDEMPer period is enabled by the UseDEMExit setting and also contains three variants of EDEMVariant execution to choose from. Variant 1: exit from buys occurs when DeMarker is above the 1-EDEMLevel level, from sells when it is below EDEMLevel. The second variant: exit from buys occurs when DeMarker crosses the 1-EDEMLevel level from top to bottom, from sells the EDEMLevel level from bottom to top. The third variant is similar to the second, only the 0.5 level is taken as the level. The rule is activated ExitProfitMinutesDEM days after entry.
- Exit by WPR with the EWPRPer period is enabled by the UseWPRExit setting and also contains three variants of EWPRVariant execution to choose from. Variant 1: exit from buys occurs when WPR is above the -EWPRLevel level, from sells when it is below EWPRLevel-100. The second variant: exit from buys occurs when WPR crosses the -EWPRLevel level from top to bottom, from sells the EWPRLevel-100 level from bottom to top. The third variant is similar to the second, only the -50 level is taken as the level. The rule is activated ExitProfitMinutesWPR days after entry.
- Exit by Stochastic with periods ESTOKPer, ESTODPer and ESTOSPer, built according to the ESTOMode method, is enabled by the UseSTOExit setting and contains six variants of ESTOVariant execution to choose from. Variant 1: exit from buys occurs when Stochastic is above the 100-ESTOLevel level, from sells when it is below ESTOLevel. The second variant: exit from buys occurs when Stochastic crosses the 100-ESTOLevel level from top to bottom, from sells the ESTOLevel level from bottom to top. The third variant is similar to the second, only the 50 level is taken as the level. The fourth variant is closing buys when the signal line crosses the main line from top to bottom, and sells when the signal line crosses the main line from bottom to top. The fifth variant is similar to the fourth, but the crossing must occur in the zone above 50 for buys and below 50 for sells. The sixth variant is similar to the fifth, but instead of the 50 level, the 100-ESTOLevel level is used for buys and ESTOLevel for sells. The rule is activated ExitProfitMinutesSTO days after entry.
- And the last exit rule uses the RVI indicator with the ERVIPer period and is enabled by the UseRVIExit setting. This rule contains three variants of ERVIVariant execution to choose from. Variant 1: exit from buys occurs when RVI crosses zero from top to bottom, for sells the opposite. The second variant: exit from buys occurs when the RVI signal line crosses the main one from top to bottom, from sells the opposite. The third variant is similar to the second, only crossings above zero are taken into account for buys and below zero for sells. The rule is activated ExitProfitMinutesRVI days after entry.
While both trades are open, the expert advisor waits for an exit signal and waits for an opportunity to move the trades to breakeven if the UseBE setting is enabled. At the same time, if the price has covered BEPerc percent of the entire distance from the opening price to the take profit level, then the stops on the trades are moved to the breakeven level plus BEPlusPips points as a reserve for slippage and to compensate for possible swap costs.
After the first order is closed, the trailing stop starts working if the UseMATral setting is enabled. At the same time, if the UseMATralOnStart setting is also enabled, the expert advisor will not wait for the first order to close and will start trailing immediately. The trailing stop uses a moving average with the iMAPeriod period and the iShift offset for calculation. You can set the moving calculation method yourself using the iShift parameter, and the iIndent parameter will help set the minimum distance from the current price to the moving average.
Of course, all orders of the expert advisor use stop loss and take profit. There are two options for setting stop levels in SLVariant: a fixed SL value in points or depending on the readings of the daily ATR indicator (20) with the SLCoef coefficient. Take profit is set as a percentage TPProc of the stop level value.
And finally, let us deal with money management. There are only four LotVariant options:
- The first option is FixLot. Since the expert advisor opens two orders at once, if you set the lot to 0.01, then two orders of 0.01 will be opened, totaling 0.02. If you set 0.02, two orders of 0.01 will also be opened (0.02/2 = 0.01). Similarly, if you set a 0.1 lot, two orders of 0.05 will be opened.
- The second option is a fixed percentage. Here you can set the Risk parameter, which will allow risking no more than Risk percent of the deposit.
- You can also set a fixed proportion by specifying the amount of money for opening with the minimum lot, MoneyForMinLot. If you set MoneyForMinLot = 100, with a deposit of 200 dollars, two orders of 0.01 will be opened. For a deposit of 100 dollars, two trades of 0.01 will also be opened. For a deposit of 400 dollars, two trades of 0.02 lots will be opened.
- The last MM option takes into account the drawdown obtained during testing. For example, you got a drawdown equal to 20%. In order for the maximum drawdown in real trading to be approximately the same, set MaxDD = 40 and RiskDD = 1. With MaxDD=40 and RiskDD=2, the drawdown will be twice as high as the calculated one, or 40%. With MaxDD=20 and RiskDD=1, the drawdown will also be twice as high as the calculated one, or 40%. I think the principle is clear.
And, perhaps, that is all that can be said about the trading strategy used in this expert advisor.
Monitoring
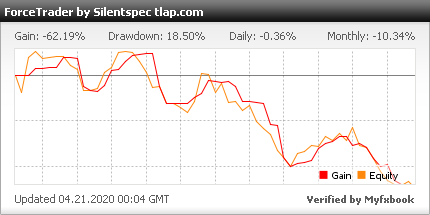
The expert advisor works in Robotest
Testing the Expert Advisor

Before installing any expert advisor on an account, it is necessary to test it in order to avoid disappointment later and make sure the current settings are working. This will help you identify outdated or unsuitable sets, make sure you have chosen the right broker, and calculate appropriate money management. It is best to run tests over the most complete possible period of historical data, after first checking the quality of your quotes and downloading any missing data. In addition, do not forget to set a realistic spread level while also accounting for slippage, which will definitely occur.
Backtests were done for each pair separately, since the MetaTrader 4 platform does not allow multi-currency tests. Original settings files (presets) were used in testing. The tests were performed using quotes from Alpari with the original time settings. When testing with a start date earlier than 2000, closing-price quotes were used.
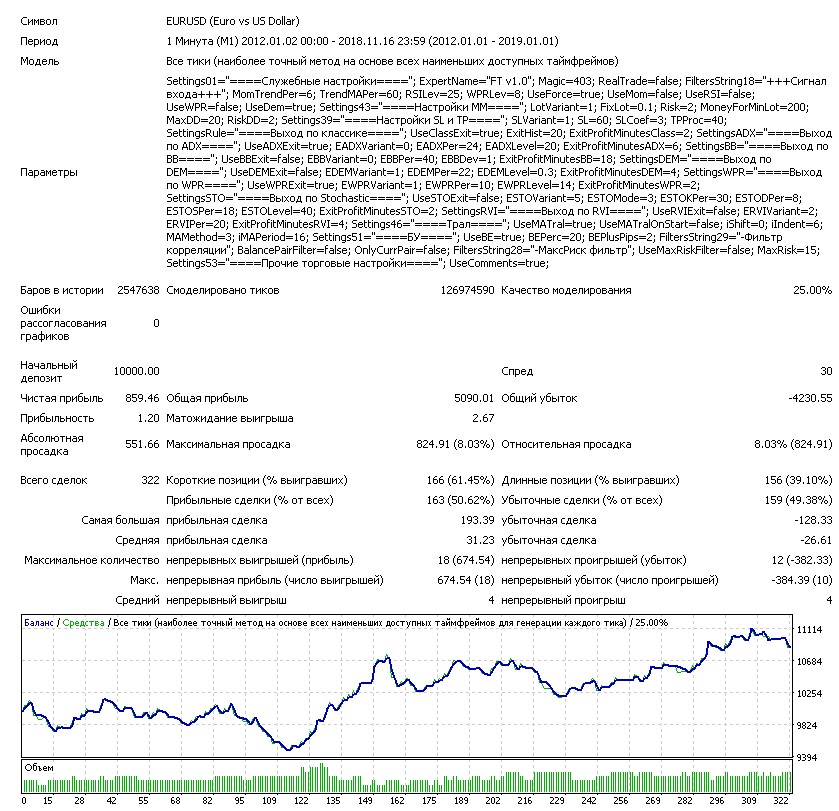
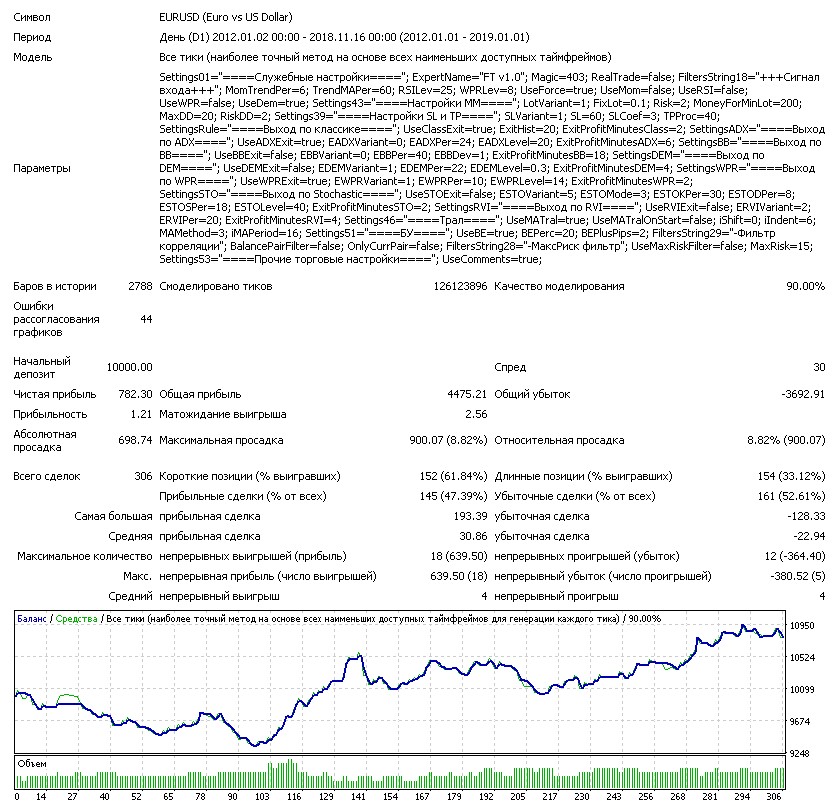
First of all, let us compare the test results for the same pair over the same period of time in different testing modes.
M1 every tick:
 D1 every tick:
 D1 by open prices:
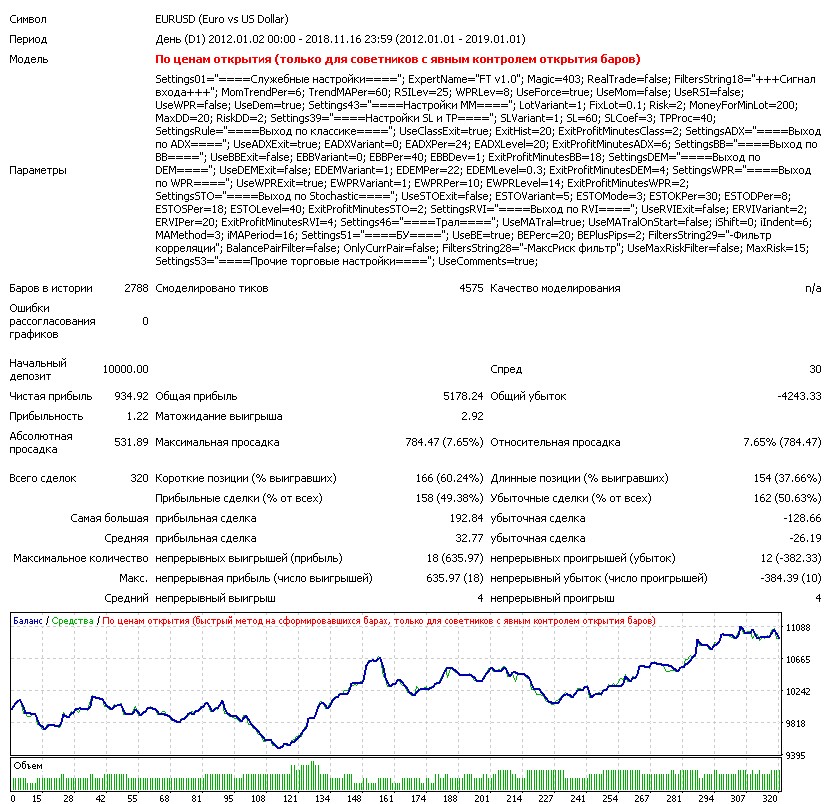 As you can see, the difference is minimal. Therefore, testing quality has little effect on this expert advisor, and tests can be run using open prices without worrying too much about the final results.
Now let us look at the fixed-lot tests. They were done separately from 2000 for Alpari quotes and from 1970 using closing prices found online from an unknown source.
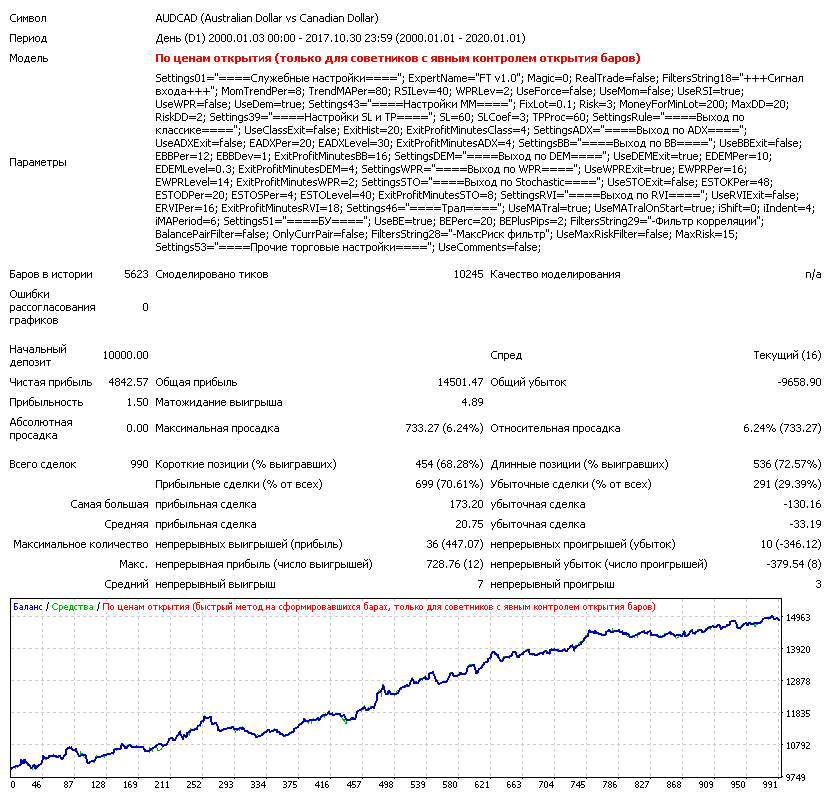
AUDCAD 2000:
 AUDCAD 1980:
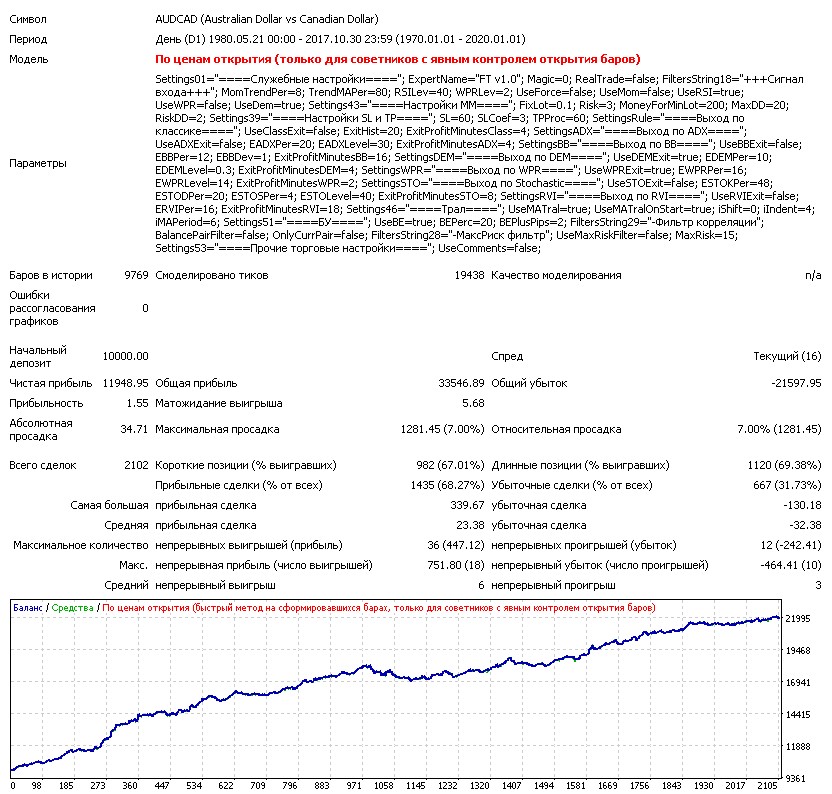 On the AUDCAD currency pair, the expert advisor shows fairly stable growth. Drawdown periods can last up to three years, while periods of confident growth last for decades. The profit factor is quite high, and the maximum drawdown is small. The average profitable trade is slightly smaller than the average losing trade, but the number of profitable trades is high.
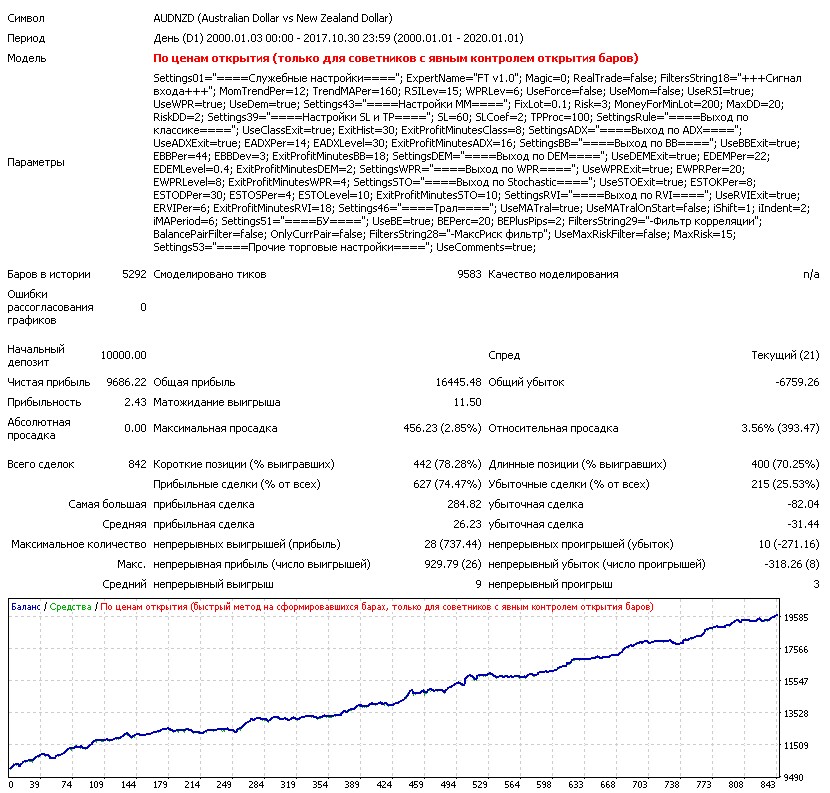
AUDNZD 2000:
 AUDNZD 1985:
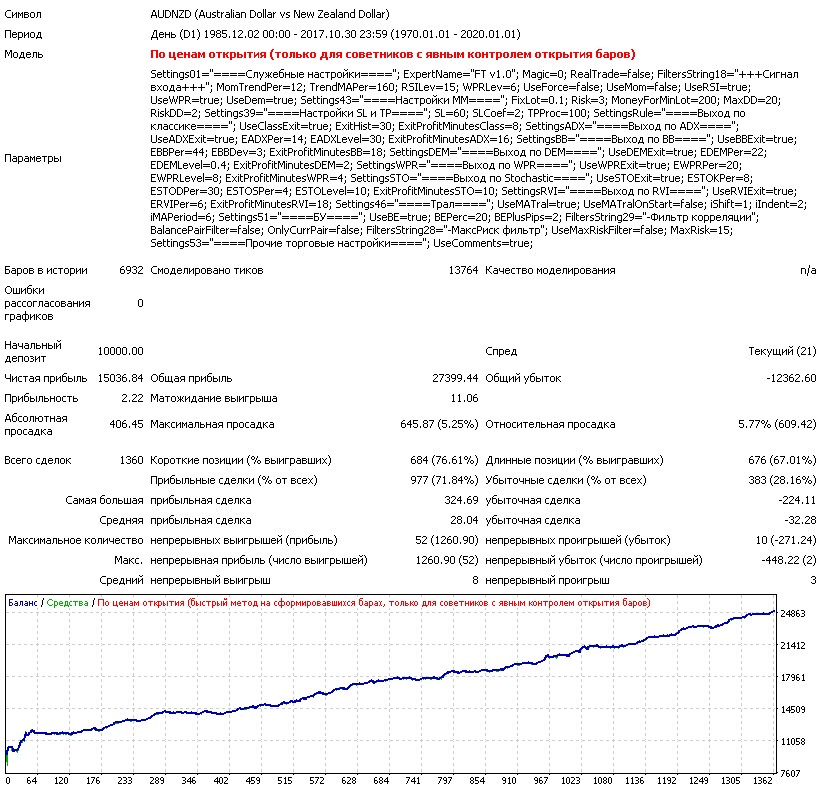 On the AUDNZD currency pair, the expert advisor shows very stable growth. Drawdown periods last several months, while periods of confident growth last for decades. The profit factor is very high, and the maximum drawdown is small. The average profitable trade is slightly smaller than the average losing trade, but the number of profitable trades is high.
AUDUSD 2000:
 AUDUSD 1971:
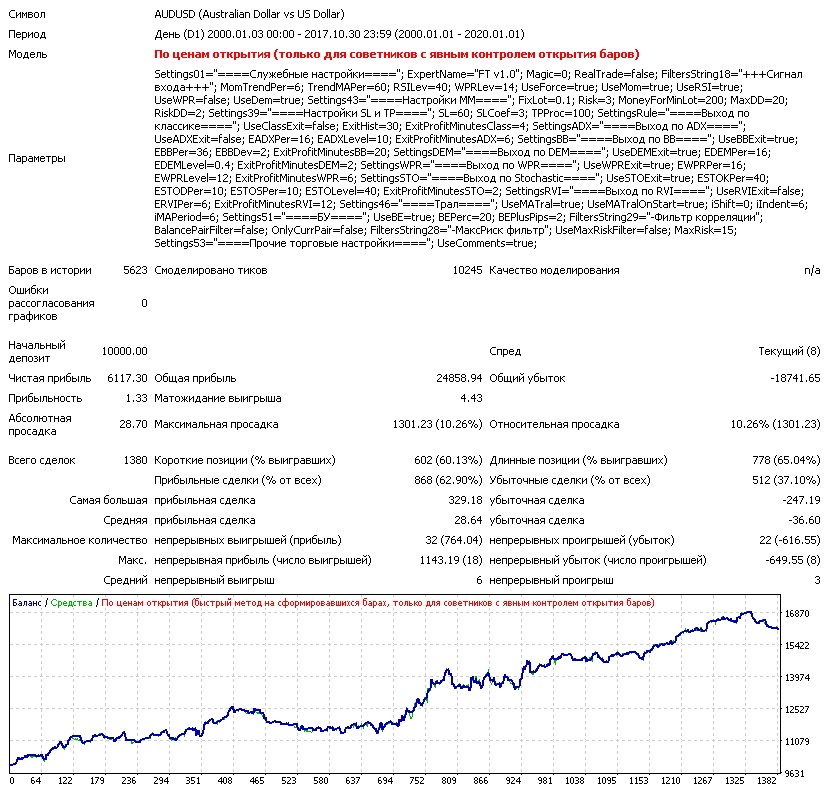
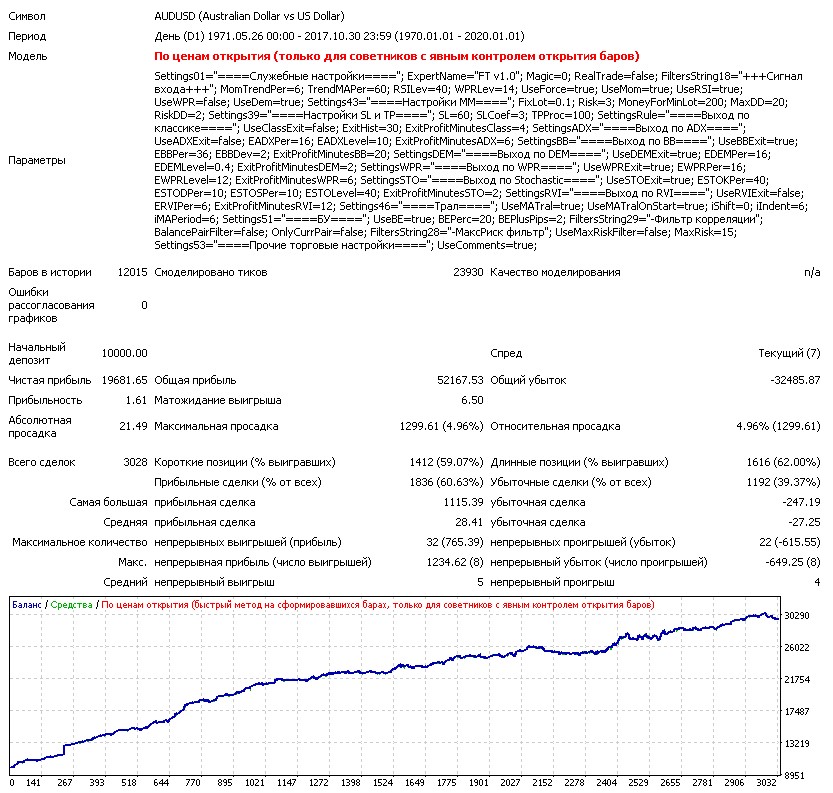 On the AUDUSD currency pair, the expert advisor shows an acceptable result. Drawdown periods last very long. The profit factor is below average, and the maximum drawdown is quite large. The average profitable trade is slightly smaller than the average losing trade, and the number of profitable trades is not very high. In addition, over the last year the expert advisor on this pair has been losing the deposit. Nevertheless, over a longer period the results look acceptable.
CADCHF 2000:
 CADCHF 1971:
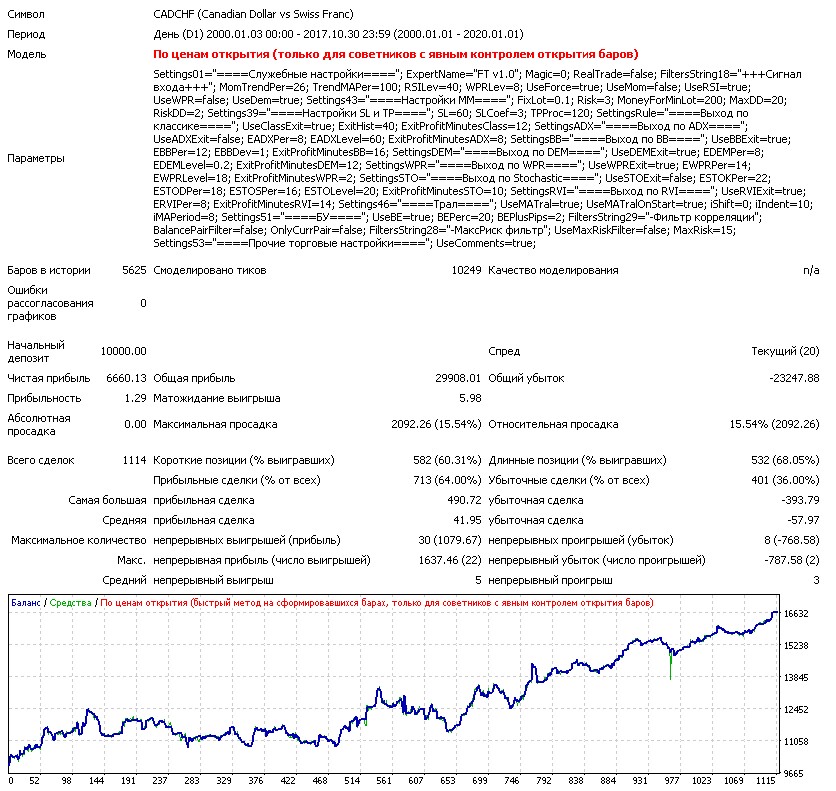
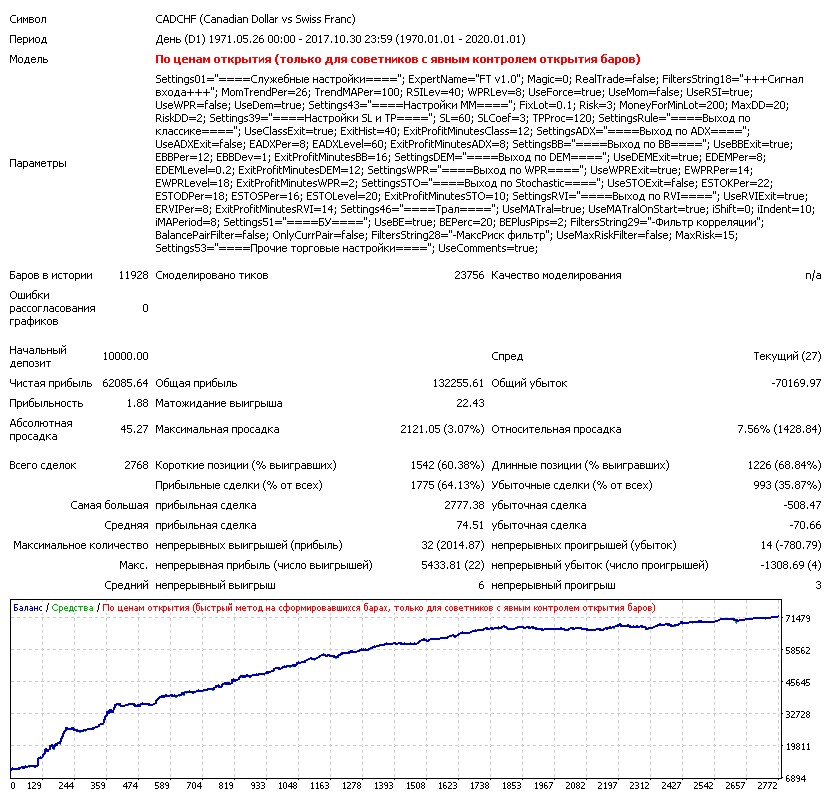 On the CADCHF currency pair, the expert advisor shows an acceptable result. Drawdown periods last very long. The profit factor is below average, and the maximum drawdown is large. The average profitable trade is slightly smaller than the average losing trade, and the number of profitable trades is not very high. It is clearly visible that the expert advisor grows the deposit in waves, alternating long drawdown periods with periods of effective performance. Nevertheless, over a longer period the results look acceptable. But it is worth paying attention to the latest segment compared with the previous one: the slope of the equity curve has clearly slowed down, which may indicate a partial loss of efficiency of this strategy on pairs with the Swiss franc.
EURUSD 2000:
 EURUSD 1971:
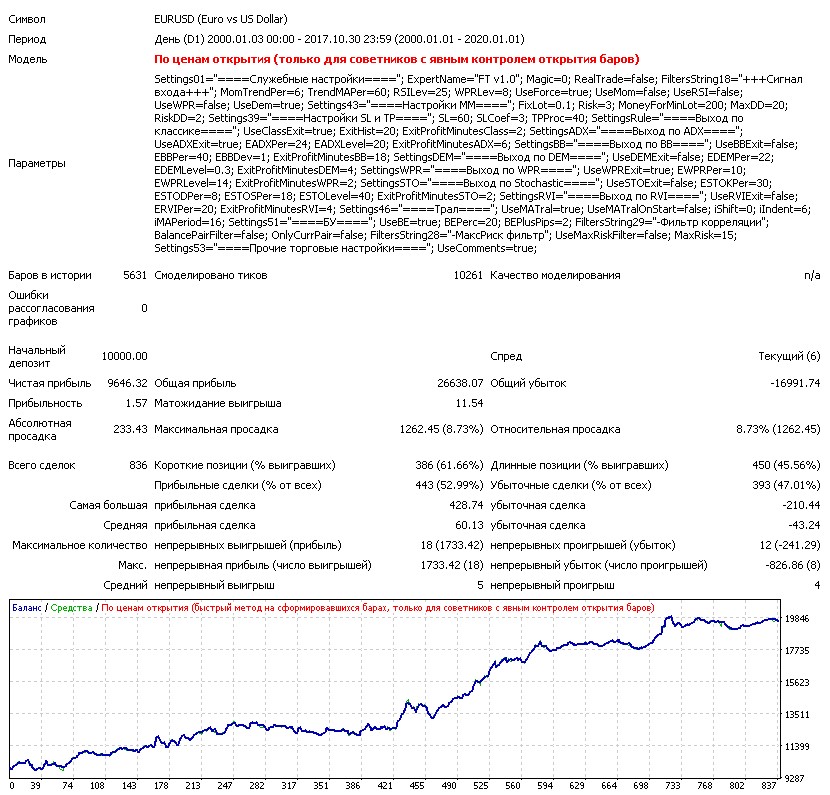
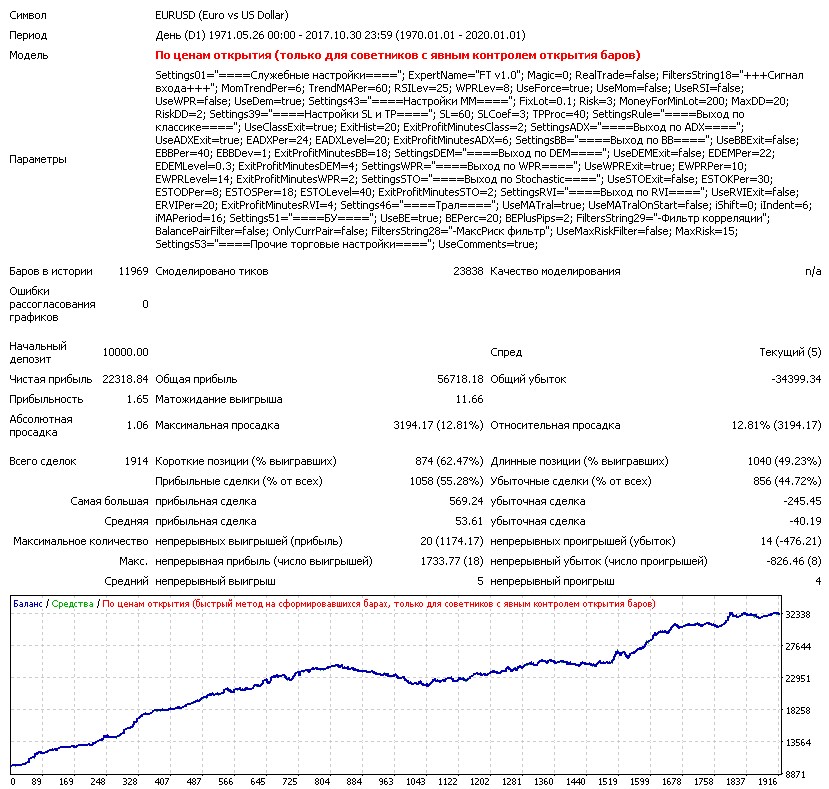 On the EURUSD currency pair, the expert advisor shows a decent result. Drawdown periods last very long. The profit factor is above average, and the maximum drawdown is within normal limits. The average profitable trade is larger than the average losing trade, while the number of profitable trades is not very high. It is clear that short positions on this pair work better for the expert advisor than buys, so it makes sense to limit the use of this set to sells only. Over a longer period, it is noticeable how the strategy lost its efficiency around the end of the nineties, but then continued to earn again.
NZDCAD 2000:
 NZDCAD 1985:
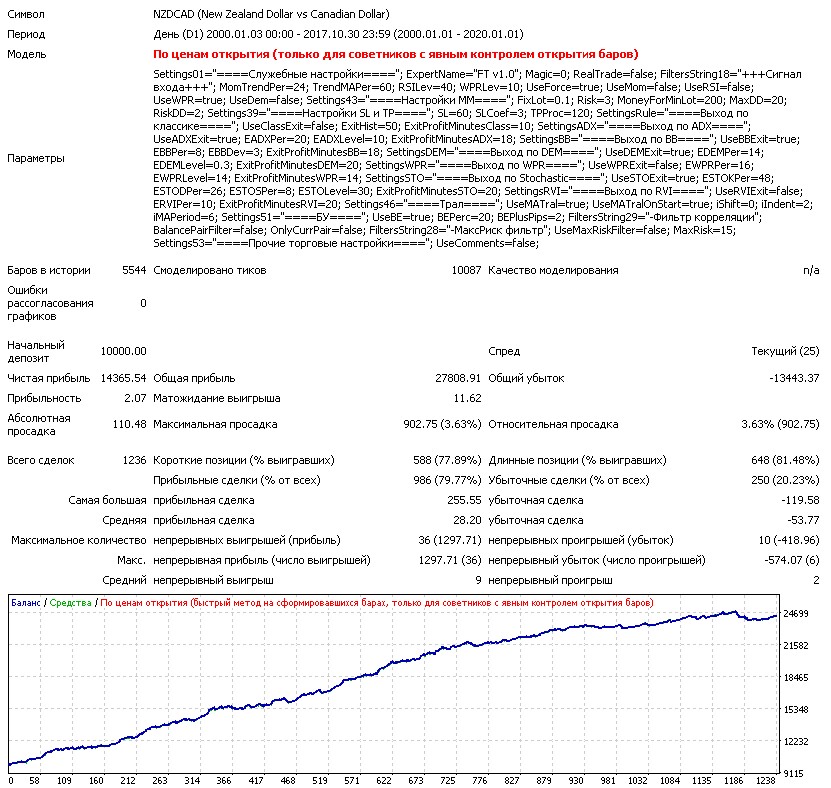
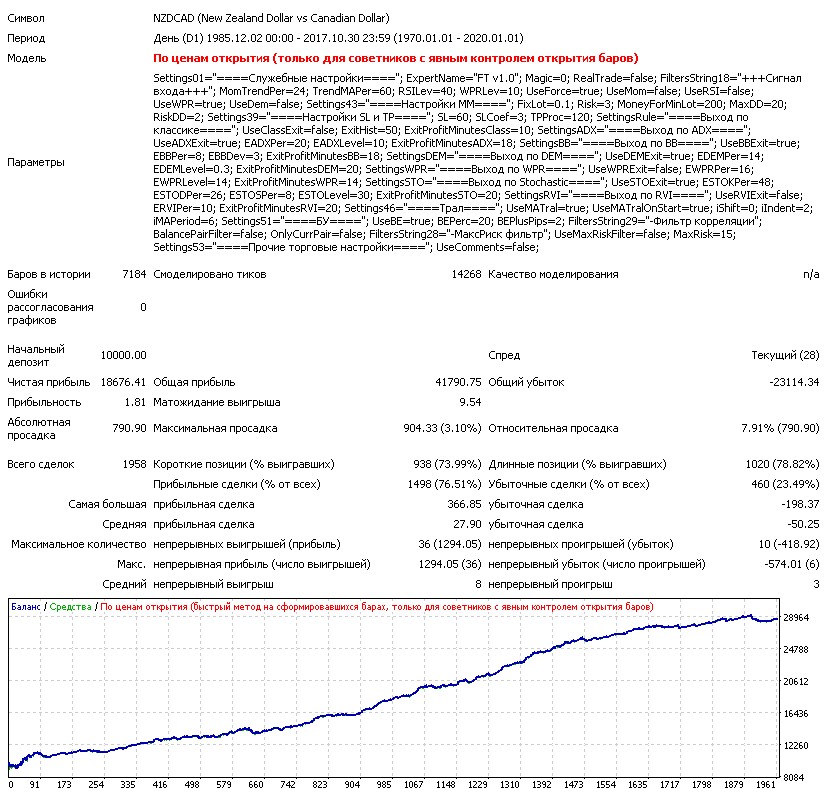 On the NZDCAD currency pair, the advisor shows a good result. The equity curve grows quite steadily. The profit factor is high, and the maximum drawdown is very small. The average winning trade is quite a bit lower than the average losing trade, but the number of winning trades approaches 80%. Over a longer period it is noticeable how, from around 2015, the strategy loses its effectiveness, so it is worth being cautious with this set.
NZDUSD 2000:
 NZDUSD 1971:
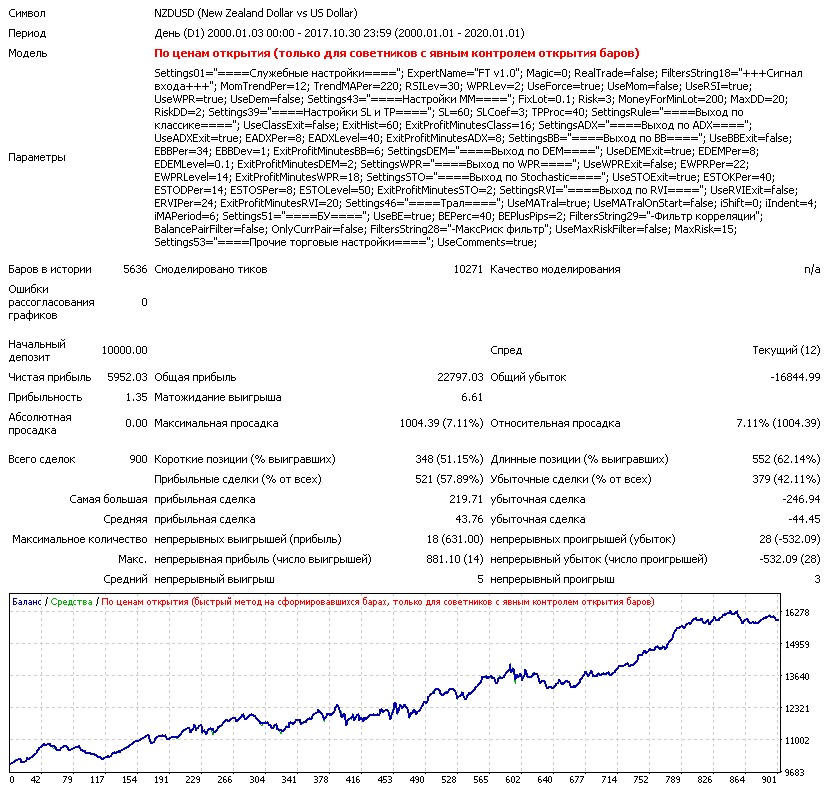
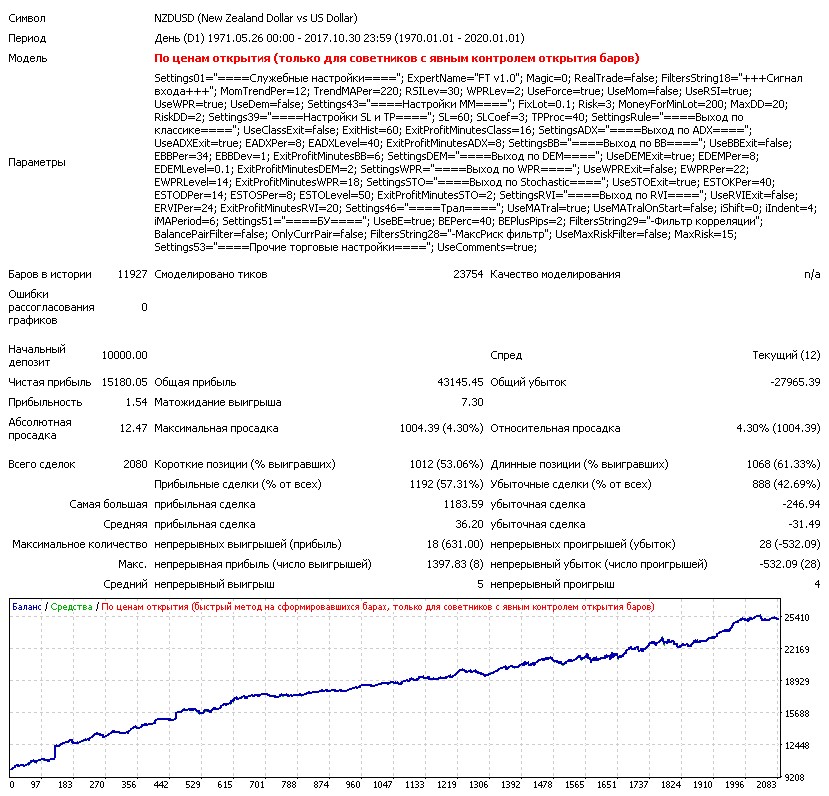 On the NZDUSD currency pair, the advisor shows an acceptable result. The equity curve grows quite steadily, although drawdown periods last quite a long time. The profit factor is below average, and the maximum drawdown is acceptable. The average winning trade is almost equal to the average losing trade, and the number of winning trades is acceptable. There are noticeably more profitable long positions than profitable short ones, so it makes sense to set the advisor settings for this set to buys only. Over a longer period it is noticeable how, from around 2015, the strategy loses its effectiveness, so it is worth being cautious with this set and, apparently, with all NZD currency sets.
USDCAD 2000:
 USDCAD 1971:
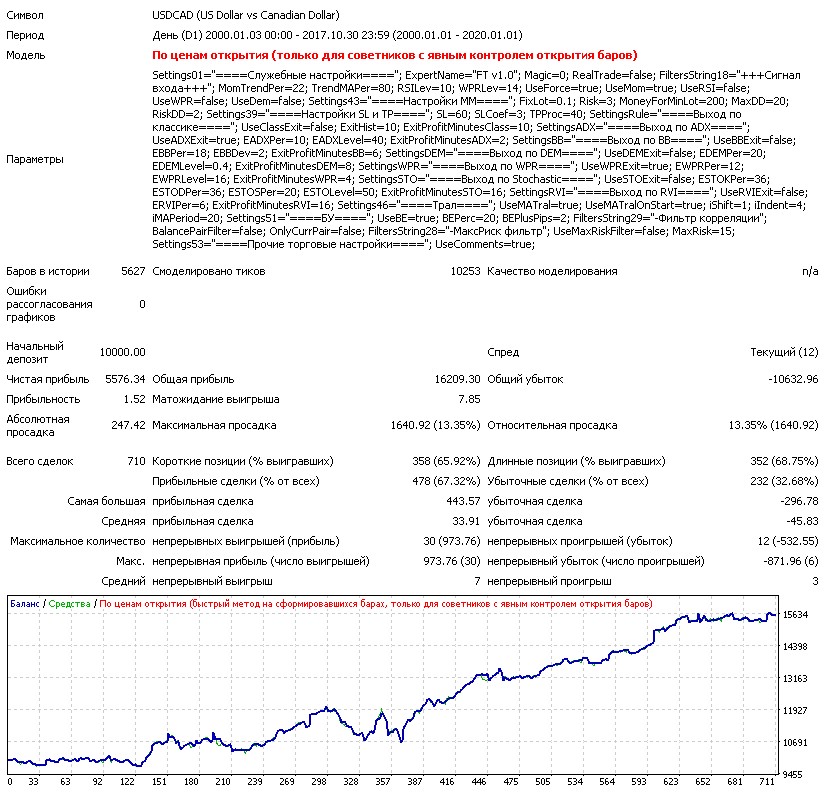
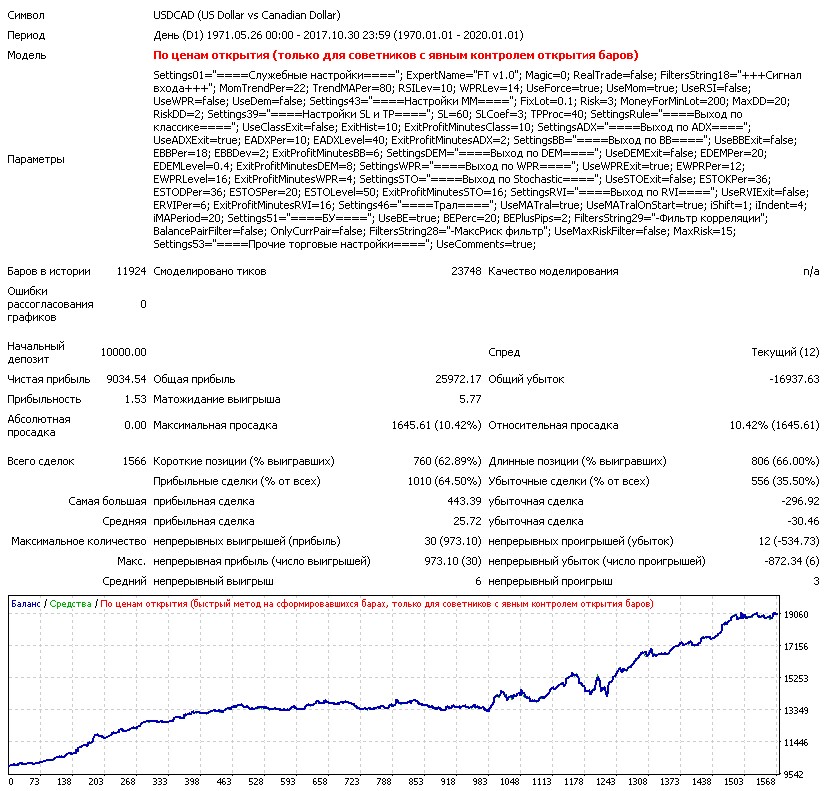 On the USDCAD currency pair, the advisor shows an acceptable result. The equity curve grows quite steadily, although drawdown periods last quite a long time. The profit factor is not bad, and the maximum drawdown is rather large. The average winning trade is slightly smaller than the average losing trade, and the number of winning trades is quite high. Over a longer period it is noticeable that, from around 2010, the strategy noticeably improved in effectiveness. Nevertheless, drawdowns have been observed over the last year to year and a half.
USDCHF 2000:
 USDCHF 1971:
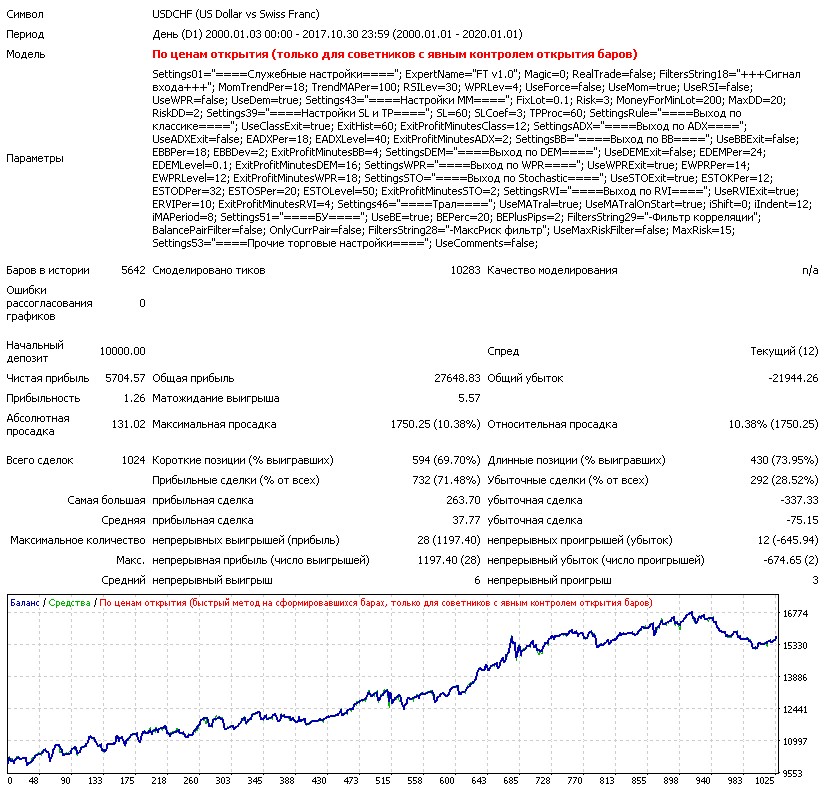
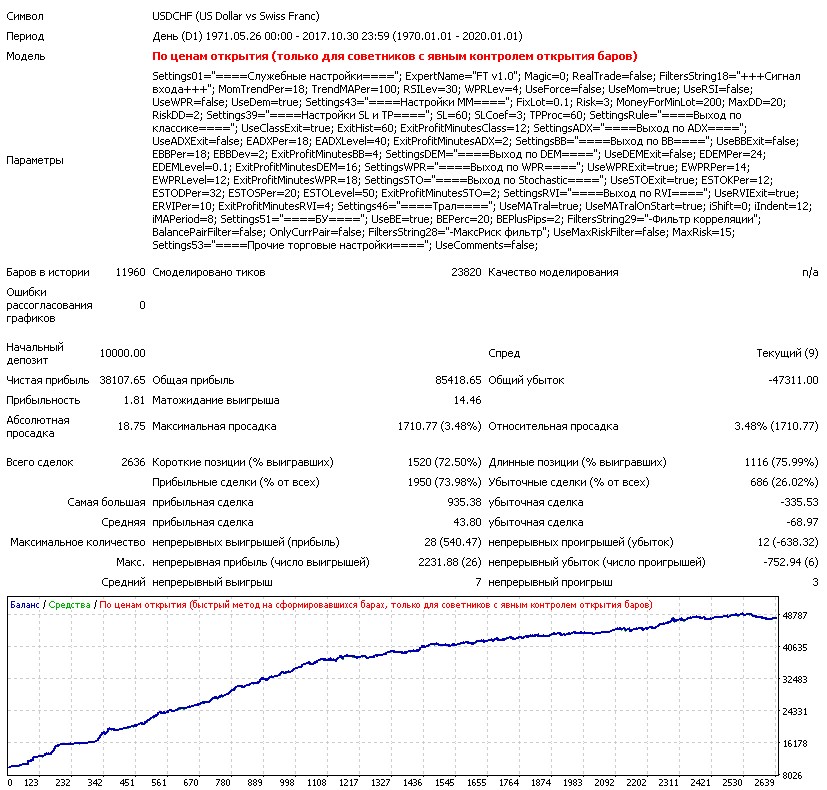 On the USDCHF currency pair, the advisor shows an acceptable result. The equity curve grows, and drawdown periods are overcome quite quickly. The profit factor is acceptable, although on the edge, and the maximum drawdown is average. The average winning trade is quite a bit smaller than the average losing trade, but the number of winning trades is quite high. It is noticeable how, from around 2017, the strategy went into drawdown, but it seems the bottom has already been passed. Nevertheless, since the early 2000s the strategy has lost a little in effectiveness, like all advisor sets involving the Swiss franc.
USDJPY 2000:
 USDJPY 1971:
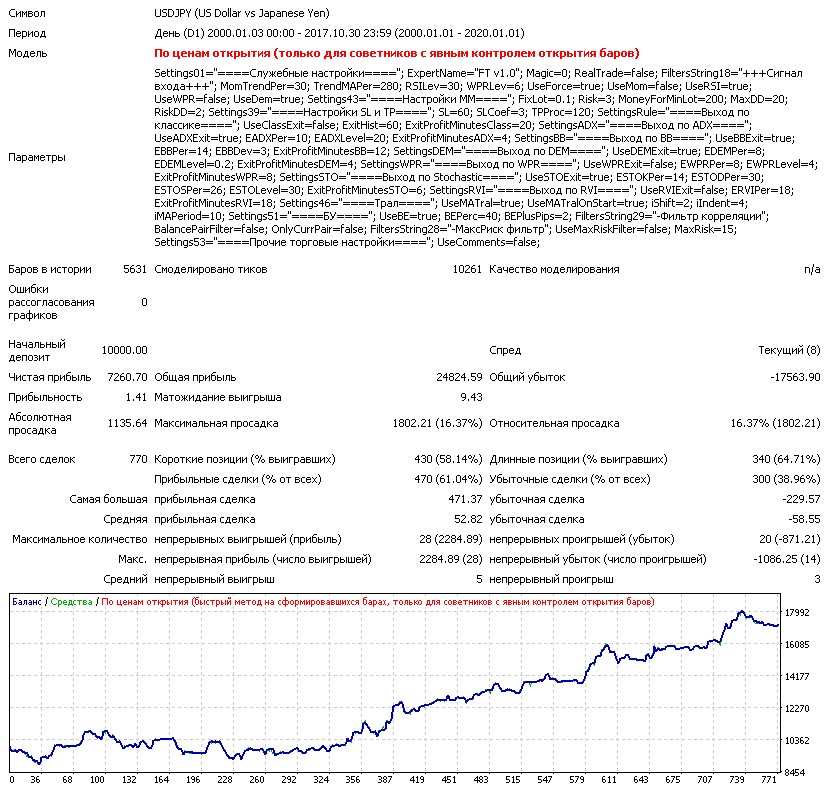
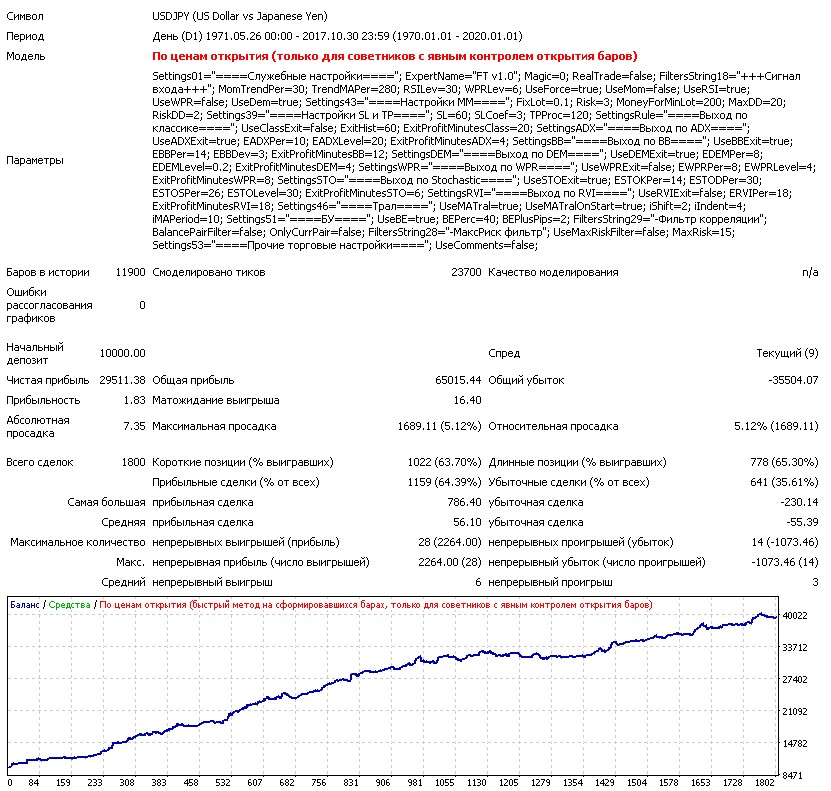 On the USDJPY currency pair, the advisor shows a fairly good result. The equity curve grows, although drawdown periods sometimes last quite a long time. The profit factor is acceptable, and the maximum drawdown is somewhat high. The average winning trade is only slightly smaller than the average losing trade, and the number of winning trades is around 60%. It is noticeable how, from around 2000, the strategy went into a prolonged drawdown, but from around 2007-2009 it switched back into growth mode. Recently, the strategy has also been experiencing drawdown.
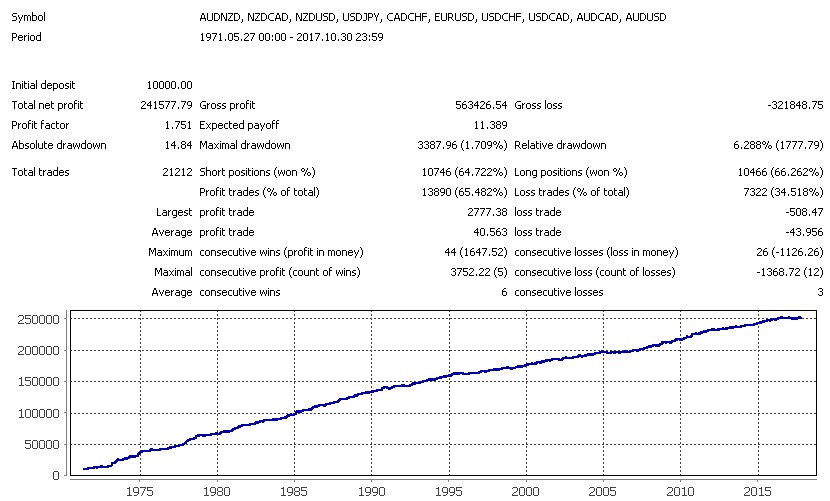
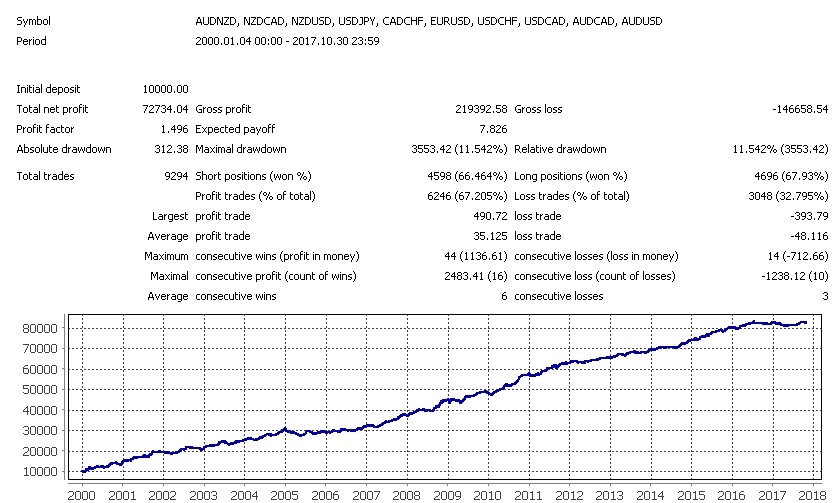
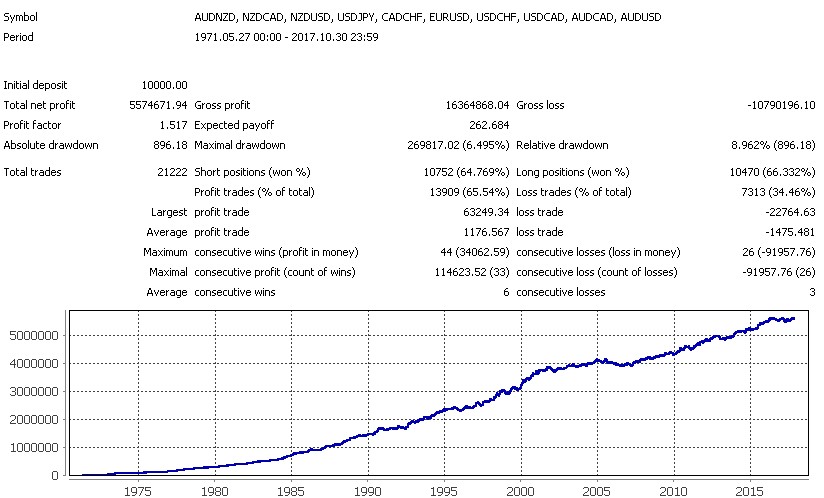
Now let us consider combined tests of all currency pairs:
Since 1971:
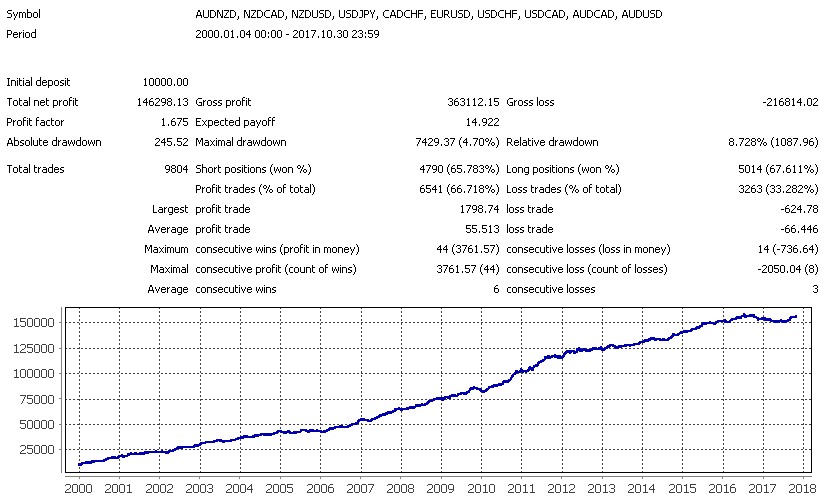
 Since 2000:
 And with the application of money management of 1% of the deposit per trade since 1971:
 Since 2000:
 Since 2015:
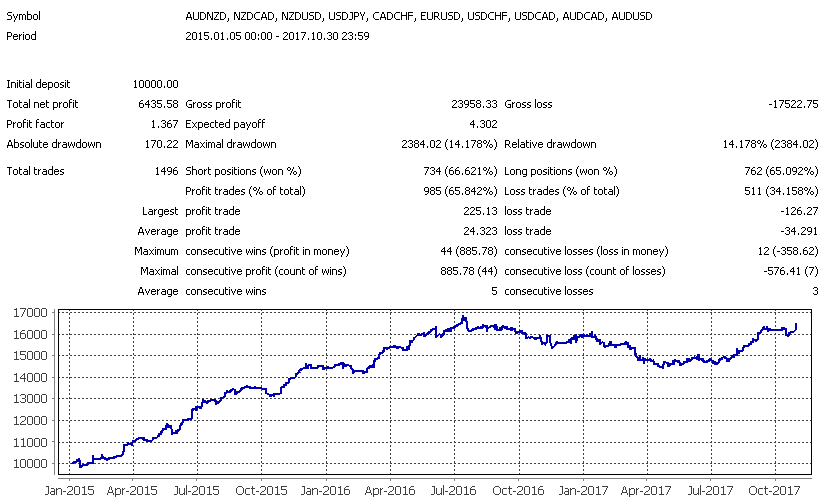 The advisor showed fairly stable results on the major currency pairs over a long period of time. Of course, as a standalone EA it has a rather modest result, but as part of a diversified long-term portfolio it will show itself excellently.
Recommended money management

A risk per trade of 1 to 2 percent of the deposit is recommended. You can simply set the risk level in the advisor parameters and everything will be calculated automatically. Before selecting an acceptable risk level, I recommend testing with the deposit level that you plan to use and evaluating the drawdown level. The minimum recommended deposit for use on all pairs is 1000 dollars.
Description of parameters and settings

"Service settings" block
ExpertName - the name of the expert, what is written in the order comment;
Magic – magic order number;
RealTrade – real trading/test switch. The point is that the expert advisor opens real trades at 00:30 instead of 00:00. This is done to wait out the day rollover period, when the spread widens very strongly and some brokers disable the ability to trade. For tests, the option to trade at 00:00 is provided so that testing can be carried out using the day's opening prices on the D1 period.
"Entry Signal" block
MomTrendPer – Momentum indicator period for determining the current impulse;
TrendMAPer – moving average period for determining the current trend;
RSILev – level for the RSI indicator signal;
WPRLev – level for the WPR indicator signal;
UseForce – enable the Force indicator signal;
UseMom – enable the Momentum indicator signal;
UseRSI – enable the RSI indicator signal;
UseWPR – enable the WPR indicator signal;
UseDem – enable the DeMarker indicator signal.
"MM Settings" block
LotVariant – MM option:
- Fixed lot
- Fixed percentage
- Ralph Vince fixed ratio
- Fixed percentage by maximum drawdown
FixLot - fixed lot;
Risk - risk as a percentage of the deposit;
MoneyForMinLot - deposit funds for the minimum lot;
MaxDD - maximum drawdown;
RiskDD - risk as a percentage of drawdown;
"SL and TP Settings" block
SLVariant – SL setting option:
- fixed stop
- stop by ATR
SL - fixed stop size;
SLCoef - ATR stop coefficient;
TPProc - size as a % of the stop.
"Classic Exit" block
UseClassExit - exit rule switch;
ExitHist - number of candles in the history for tracking extremes;
ExitProfitMinutesClass - the minimum number of candles required to enable the signal.
"ADX Exit" block
UseADXExit - exit rule switch;
EADXVariant - rule operation mode:
- above the level
- crossed the level
- falls for 3 candles in a row and crosses the level
EADXPer - ADX period;
EADXLevel - ADX level;
ExitProfitMinutesADX - the minimum number of candles required to enable the signal.
"BB Exit" block
UseBBExit - exit rule switch;
EBBVariant - rule operation mode:
- above the upper BB
- was above the upper BB, then moved below
- below the lower BB
EBBPer - BB period;
EBBDev - BB deviation;
ExitProfitMinutesBB - the minimum number of candles to enable the signal.
"Exit by DEM" block
UseDEMExit - the exit rule switch;
EDEMVariant - the rule operation variant:
- above the upper level
- was above the upper level, became below
- crossed zero
EDEMPer - DeMarker period;
EDEMLevel - DeMarker level;
ExitProfitMinutesDEM - the minimum number of candles to enable the signal.
"Exit by WPR" block
UseWPRExit - the exit rule switch;
EWPRVariant - the rule operation variant:
- above the upper level
- was above the upper level, became below
- crossed zero
EWPRPer - WPR period;
EWPRLevel - WPR level;
ExitProfitMinutesWPR - the minimum number of candles to enable the signal.
"Exit by Stochastic" block
UseSTOExit - the exit rule switch;
ESTOVariant - the rule operation variant:
- above the upper level
- was above the upper level, became below
- crossed zero
- crossed the signal line
- crossed the signal line above zero
- crossed the signal line above the level
ESTOMode – indicator calculation method;
ESTOKPer – k period of the Stochastic indicator;
ESTODPer – d period of the Stochastic indicator;
ESTOSPer – s period of the Stochastic indicator;
ESTOLevel – indicator level;
ExitProfitMinutesSTO – the minimum number of candles to enable the signal;
"Exit by RVI" block
UseRVIExit – the exit rule switch;
ERVIVariant – the rule operation variant:
- crossed zero
- crossed the signal line
- crossed the signal line above zero
ERVIPer – RVI indicator period;
ExitProfitMinutesRVI – the minimum number of candles to enable the signal.
"Trailing" block
UseMATral – enable moving-average trailing;
UseMATralOnStart – enable moving-average trailing from the very moment of entering the position (without waiting for the first order to close);
iShift – moving average shift;
iIndent – offset from the moving average;
MAMethod – moving average type;
iMAPeriod - moving average period.
"BE" Block
UseBE - enables the move-to-breakeven function;
BEPerc - the profit percentage upon reaching which the order stops can be moved to the breakeven level;
BEPlusPips - a buffer in pips beyond the breakeven level.
"Correlation Filter" Block
Described in detail above.
BalancePairFilter - enables the function;
OnlyCurrPair - operation only for the current pair.
"MaxRisk Filter" Block
Described in detail above.
UseMaxRiskFilter - enables the maximum risk filter;
MaxRisk - the maximum deposit risk.
"Other Trading Settings" Block
UseComments - turns the use of outputting comments about the expert advisor's operation to the log on or off (used mainly for debugging).
Conclusion

The Force Trader expert advisor is a conservative momentum robot built on a modified classic strategy and is capable of generating profit over a long time horizon. It is a multicurrency expert advisor that applies a trading strategy that has remained effective for many decades. However, in the short term, profitability may remain in the neutral or negative zone for some time.
The expert advisor can be used as part of a portfolio of conservative expert advisors, as well as an addition to manual trading. Also note that the advisor does not trade often.
This is a fairly reliable classic strategy with modern improvements. You should not expect fast and huge profits, but if you have been in the market for a long time, you will understand the true value of this robot: a reliable system tested over the years that provides confidence during drawdowns and a decent return over the long term.
Important!
For the expert advisor to work correctly, the trading terminal must be turned on from the market open on Sunday evening until its close on Friday evening. If you do not have the ability to keep your computer running 24/5, it is recommended to use a VPS server service.
Download the Force Trader expert advisor

Sincerely, Dmitry aka Silentspec TradeLikeaPro.ru
